Culinary Advisor
A cooking platform built around craft, culture, and the stories behind what we eat.
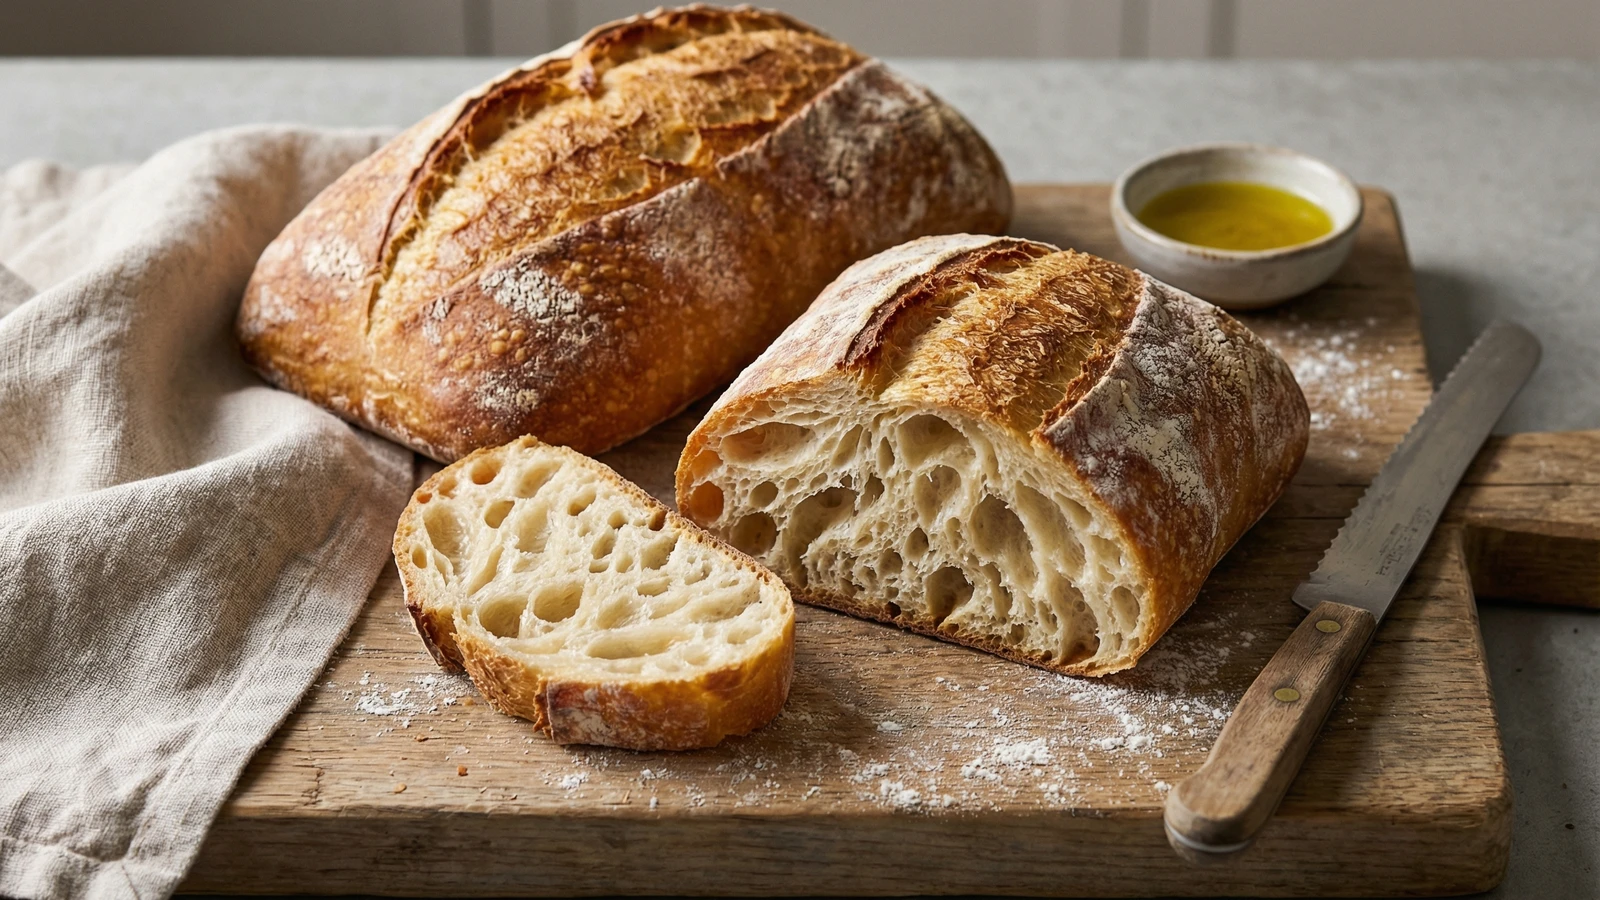
Sourdough Ciabatta
Created by
Italian slipper bread transformed by wild yeast fermentation, yielding an impossibly open crumb, shattering crust, and the honest tang that only time and patience can produce.
Ciabatta arrived in Italy in 1982, invented by a baker in the Veneto region who wanted to compete with French baguettes flooding across the border. The name means slipper, and the shape should remind you of one: flat, wide, unpretentious. This is a bread that refuses to stand at attention.
When you introduce sourdough to the equation, something remarkable happens. The wild yeasts and lactobacilli in your starter produce organic acids during their slow work, and those acids do more than create flavor. They strengthen the gluten network, allowing you to push the hydration higher than commercial yeast would permit. The result is a crumb so open you can see daylight through it. Holes the size of grapes. A crust that shatters audibly when you tear into it.
This is not a bread for the impatient. You'll need an active sourdough starter, and you'll need to plan ahead. The dough ferments overnight in your refrigerator, developing complexity while you sleep. But the actual hands-on work amounts to perhaps twenty minutes spread across two days. Most of your job is staying out of the way and letting the microbes do theirs.
I've watched students approach high-hydration doughs with fear. The mixture looks like a disaster. It sticks to everything. It seems impossible that this wet, shaggy mass could become bread. Trust the process. By the time you've completed four sets of stretch and folds, you'll feel the dough transform beneath your hands. It will become smooth, elastic, alive. That moment never gets old.
The technique, the tradition, and the story behind every dish.
Discover Culinary AdvisorIngredients
bread flour
Quantity
500g (4 cups)
plus more for dusting
active sourdough starter
Quantity
100g (1/2 cup)
100% hydration, fed 4-8 hours prior
water
Quantity
400g (1 3/4 cups)
room temperature, 70-75°F
fine sea salt
Quantity
10g (2 teaspoons)
rice flour
Quantity
for dusting work surface
| Ingredient | Quantity |
|---|---|
| bread flourplus more for dusting | 500g (4 cups) |
| active sourdough starter100% hydration, fed 4-8 hours prior | 100g (1/2 cup) |
| waterroom temperature, 70-75°F | 400g (1 3/4 cups) |
| fine sea salt | 10g (2 teaspoons) |
| rice flour | for dusting work surface |
Equipment Needed
- •Digital kitchen scale (essential for bread baking)
- •Large mixing bowl with lid or plastic wrap
- •Bench scraper
- •Baking stone or heavy sheet pan
- •Cast iron skillet for steam
- •Linen couche or parchment paper
- •Instant-read thermometer
- •Wire cooling rack
Instructions
- 1
Mix the dough
In a large bowl, combine the bread flour and water. Use your hand like a claw, rotating through the mixture until no dry flour remains. The dough will look shaggy and feel sticky. Cover with a damp kitchen towel and let rest for 30 minutes to 1 hour. This autolyse period allows the flour to fully hydrate and begins gluten development before you've done any real work.
Water temperature matters. Aim for 70-75°F in summer, up to 80°F in a cold kitchen. The dough should feel pleasantly cool, not cold. - 2
Add starter and salt
Spread the active sourdough starter over the dough surface, then sprinkle the salt on top. Using wet hands, squeeze the dough through your fingers repeatedly, folding it over itself, until starter and salt are fully incorporated. This takes 3 to 4 minutes of aggressive mixing. The dough will feel lumpy and uneven at first, then gradually smooth out. When you can stretch a small piece thin enough to see light through it without tearing, your gluten is developing properly.
- 3
Perform stretch and folds
Over the next 2 to 3 hours, perform 4 sets of stretch and folds, spaced 30 to 45 minutes apart. For each set: wet your hand, slide it under one side of the dough, stretch it upward until you feel resistance, then fold it over the center. Rotate the bowl 90 degrees and repeat. Continue around all four sides. You'll feel the dough strengthen with each set. By the fourth round, it should feel pillowy, smooth, and will hold its shape better in the bowl.
Don't skip wetting your hands. High-hydration dough sticks to everything dry and releases from everything wet. - 4
Bulk fermentation
After your final stretch and fold, cover the bowl tightly with plastic wrap or a fitted lid. Let the dough rise at room temperature until increased in volume by about 50 percent, with visible bubbles on the surface and sides. In a 75°F kitchen, this takes 3 to 4 hours. Then transfer the covered bowl to the refrigerator for an overnight cold ferment, 8 to 16 hours. The cold slows fermentation while flavor compounds continue developing.
- 5
Prepare for shaping
Remove the dough from the refrigerator. It should have continued to rise slightly and smell pleasantly tangy, like yogurt. Generously flour your work surface with a mixture of bread flour and rice flour. The rice flour prevents sticking without absorbing into the dough. Turn the dough out gently onto the floured surface. Dust the top with more flour.
Work the dough cold, straight from the refrigerator. Cold dough is easier to handle and shape without deflating those precious air pockets. - 6
Shape the loaves
Using a bench scraper or large knife dusted with flour, divide the dough in half. Handle it gently. You've spent hours developing those air bubbles; don't crush them now. For each piece, use floured hands to gently stretch it into a rough rectangle, about 10 by 5 inches. Then perform a simple fold: bring the left third over the center, then the right third over that, like folding a letter. Flip the dough seam-side down. That's it. No tight shaping, no surface tension tricks. Ciabatta wants to be loose and relaxed.
- 7
Final proof
Transfer the shaped loaves to a floured couche (linen cloth) or parchment-lined baking sheet, leaving several inches between them. Cover loosely with a kitchen towel. Let proof at room temperature for 45 minutes to 1 hour and 15 minutes. The dough should look puffy and jiggle when you gently shake the pan. If you poke it with a floured finger, the indent should spring back slowly but not completely. This means fermentation is active but the dough still has structure.
- 8
Preheat with steam setup
Thirty minutes before baking, position a rack in the center of your oven with a baking stone or inverted sheet pan on it. Place an empty cast iron skillet or metal pan on the bottom rack. Preheat to 475°F. The stone needs this full time to absorb enough heat to give your loaves proper oven spring. Boil a kettle of water.
A baking stone makes a significant difference, but an inverted heavy sheet pan preheated for 30 minutes works respectably. - 9
Transfer and create steam
Gently flip each loaf onto a floured peel or the back of a sheet pan, so the seam side faces up. The irregular surface becomes your crust character. Slide the loaves onto the hot stone, working quickly. Immediately pour about 1 cup of boiling water into the cast iron skillet on the bottom rack and close the oven door fast. The steam burst keeps the crust pliable during the first minutes of baking, allowing maximum oven spring before the crust sets.
Stand back when adding water to the hot pan. The steam erupts immediately and can burn. - 10
Bake until deeply golden
Bake for 10 minutes with steam. Then carefully remove the cast iron skillet or crack the oven door briefly to release remaining steam. Continue baking for 12 to 15 minutes more, until the crust is deeply golden brown, almost mahogany in places. The loaves should sound hollow when tapped on the bottom and feel light for their size, a sign that moisture has escaped and the crumb has set. Internal temperature should reach 205-210°F.
- 11
Cool completely
Transfer the loaves to a wire rack immediately. This is critical. The bread continues cooking as it cools, and moisture escaping from the crumb is what creates that shattering crust. If you trap steam against a pan or cutting board, the crust softens. Let the loaves cool for at least 45 minutes before cutting. I know the temptation. Resist it. Listen for the crackling sound as the crust contracts and crisps. That's your reward for patience.
Chef Tips
- •Your starter must be active and bubbly. Feed it 4 to 8 hours before mixing. Drop a spoonful into water; if it floats, it's ready. If it sinks, feed it again and wait.
- •The 80% hydration in this recipe produces a wet dough that terrifies beginners. If you're new to high-hydration baking, start at 75% (375g water) and work your way up as you gain confidence.
- •Temperature is your invisible ingredient. A 65°F kitchen ferments differently than an 80°F kitchen. Adjust times accordingly and learn to read the dough rather than the clock.
- •Ciabatta stales quickly because of its open crumb. Slice what you'll eat within a day and freeze the rest. Reheat frozen slices directly in a 350°F oven for 8 minutes.
- •This bread was born to carry olive oil. Serve it with your best extra virgin for dipping, or split and toast it for sandwiches where the holes catch sauce and juices.
Advance Preparation
- •Feed your sourdough starter 4-8 hours before mixing for peak activity.
- •The overnight cold ferment can extend up to 48 hours for even more flavor development. The dough becomes slightly more sour and easier to handle.
- •Shaped loaves can be proofed in the refrigerator overnight instead of at room temperature. Bake straight from cold, adding 2-3 minutes to the bake time.
- •Baked ciabatta freezes beautifully for up to 2 months. Wrap tightly in plastic, then foil. Thaw at room temperature, then refresh in a 350°F oven for 8-10 minutes.
Frequently Asked Questions
Nutrition Information
1 slice (about 75g)
Where cooking meets culture.
Culinary mentorship, cultural storytelling, and the editorial depth that makes cooking meaningful.
Explore Culinary Advisor