Culinary Advisor
A cooking platform built around craft, culture, and the stories behind what we eat.
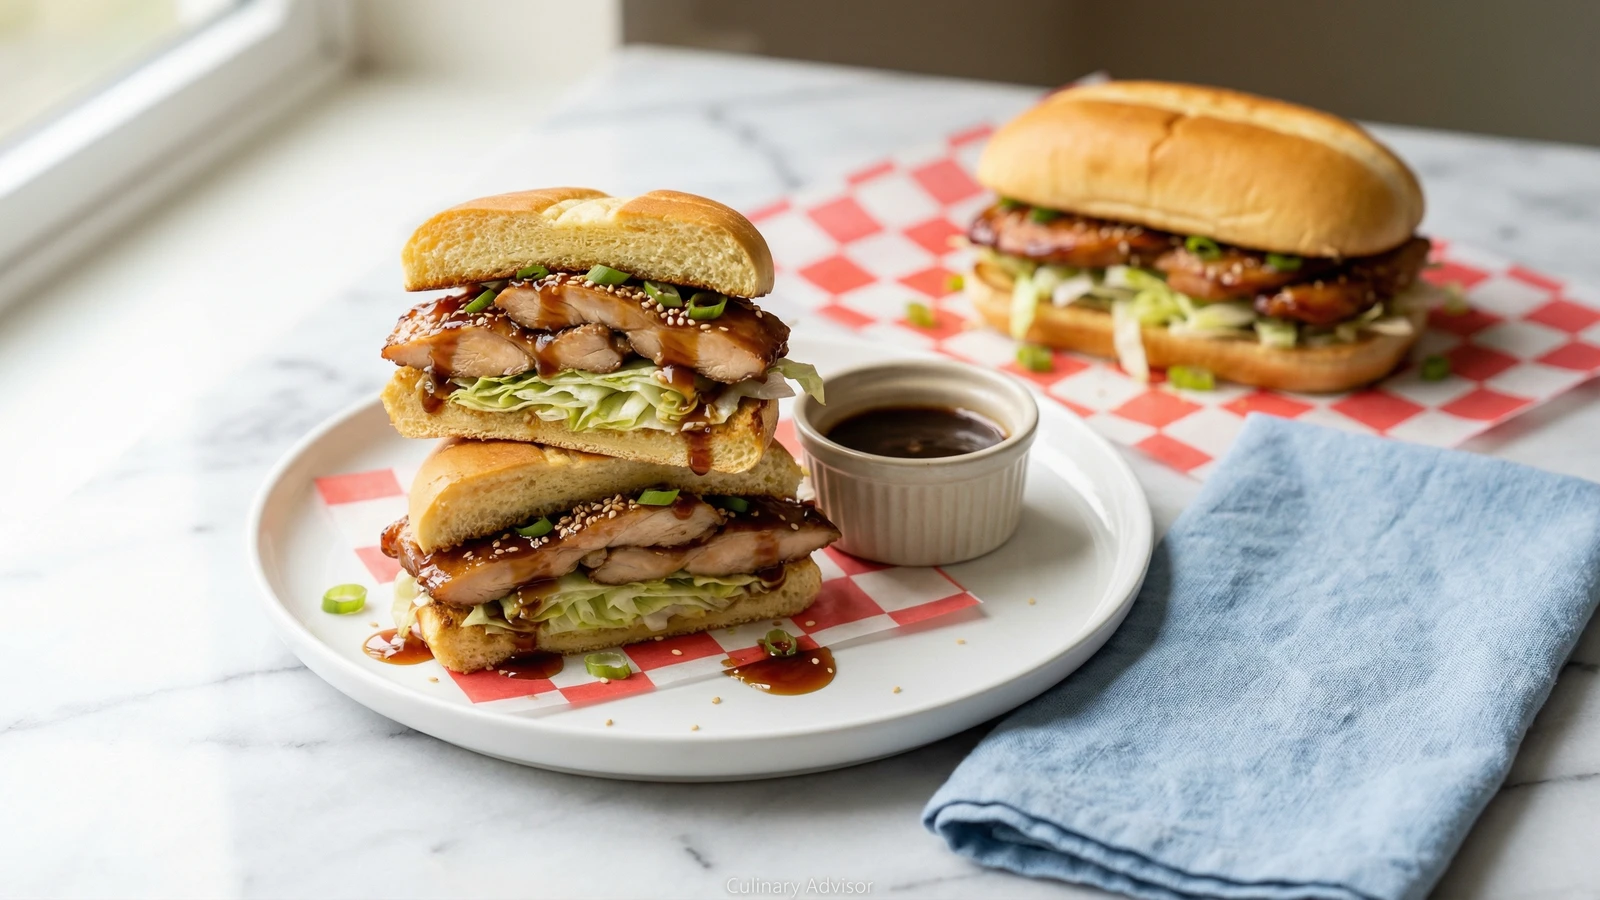
Seattle Teriyaki Chicken Sandwich
Created by
The Pacific Northwest's gift to American street food: juicy grilled chicken thighs lacquered with a sweet, garlicky teriyaki glaze, piled on a soft bun with crisp iceberg and creamy mayo. This is what happens when immigrant ingenuity meets American appetites.
Seattle has more teriyaki shops per capita than any city on earth. Walk through any neighborhood from Rainier Beach to Ballard and you'll pass storefront windows steaming with grilled chicken and rice. This isn't Japanese teriyaki. It's something born here, invented by Korean and Japanese immigrants who understood what American palates craved: sweeter, bolder, more sauce.
The Seattle teriyaki sandwich emerged from these shops in the 1980s, a handheld version of the plate lunch that fueled construction workers, students, and anyone looking for an honest meal at an honest price. The chicken gets glazed twice during cooking, building layers of caramelized soy and sugar that shatter slightly when you bite through. The sauce pools in the bun's soft crumb. The cold crunch of iceberg lettuce cuts through everything.
I've eaten these sandwiches at a dozen counters around Puget Sound, watching the cooks work their flat-top grills with practiced efficiency. The technique is simple but requires attention. You're building flavor through repetition: glaze, flip, glaze again. The sugar in the sauce wants to burn. Your job is to let it caramelize without crossing into bitter. Get this right and you'll understand why Seattle claims teriyaki as its own.
The technique, the tradition, and the story behind every dish.
Discover Culinary AdvisorIngredients
boneless, skinless chicken thighs
Quantity
1 1/2 pounds (about 6 thighs)
soy sauce
Quantity
1/2 cup
light brown sugar
Quantity
1/3 cup
packed
mirin
Quantity
3 tablespoons
rice vinegar
Quantity
2 tablespoons
garlic
Quantity
4 cloves
minced
fresh ginger
Quantity
1 tablespoon
finely grated
toasted sesame oil
Quantity
1 teaspoon
cornstarch
Quantity
1 tablespoon
cold water
Quantity
2 tablespoons
vegetable oil
Quantity
2 tablespoons
soft hamburger buns or potato rolls
Quantity
4
iceberg lettuce
Quantity
1/4 head
finely shredded
Japanese mayonnaise (Kewpie)
Quantity
1/3 cup
toasted sesame seeds
Quantity
1 tablespoon
green onions
Quantity
2
thinly sliced
| Ingredient | Quantity |
|---|---|
| boneless, skinless chicken thighs | 1 1/2 pounds (about 6 thighs) |
| soy sauce | 1/2 cup |
| light brown sugarpacked | 1/3 cup |
| mirin | 3 tablespoons |
| rice vinegar | 2 tablespoons |
| garlicminced | 4 cloves |
| fresh gingerfinely grated | 1 tablespoon |
| toasted sesame oil | 1 teaspoon |
| cornstarch | 1 tablespoon |
| cold water | 2 tablespoons |
| vegetable oil | 2 tablespoons |
| soft hamburger buns or potato rolls | 4 |
| iceberg lettucefinely shredded | 1/4 head |
| Japanese mayonnaise (Kewpie) | 1/3 cup |
| toasted sesame seeds | 1 tablespoon |
| green onionsthinly sliced | 2 |
Equipment Needed
- •12-inch cast iron skillet or flat griddle
- •Small saucepan
- •Silicone pastry brush for glazing
- •Instant-read thermometer
Instructions
- 1
Prepare the teriyaki sauce
Combine the soy sauce, brown sugar, mirin, rice vinegar, garlic, ginger, and sesame oil in a small saucepan. Bring to a simmer over medium heat, stirring until the sugar dissolves completely. The kitchen will fill with that unmistakable sweet-savory perfume. Let it bubble gently for two minutes to marry the flavors.
Authentic Seattle teriyaki runs sweeter than you might expect. Trust the proportions. The sugar caramelizes during grilling and creates that signature lacquered finish. - 2
Thicken the glaze
Whisk the cornstarch with cold water in a small bowl until smooth. Pour this slurry into the simmering sauce while whisking constantly. The sauce will thicken within thirty seconds, coating a spoon with a glossy sheen. Remove from heat and divide the sauce: half for glazing during cooking, half reserved for finishing. This separation prevents cross-contamination from raw chicken.
- 3
Prepare the chicken
Pat the chicken thighs thoroughly dry with paper towels. Moisture is the enemy of caramelization. If any thighs are significantly thicker than others, pound them gently between plastic wrap to even thickness, about half an inch. This ensures they cook at the same rate. Season lightly with salt on both sides.
Chicken thighs are non-negotiable here. Breast meat dries out before the glaze can properly caramelize. Thighs stay juicy through the repeated glazing process. - 4
Sear the chicken
Heat vegetable oil in a large cast iron skillet or on a flat griddle over medium-high heat until shimmering. Add the chicken thighs smooth-side down, leaving space between each piece. You should hear an aggressive sizzle. Let them cook undisturbed for three minutes until the underside develops golden-brown patches.
- 5
Begin the glazing process
Brush the tops of the chicken generously with teriyaki glaze from your glazing portion. Flip each thigh and let the glazed side hit the hot surface, where it will caramelize and darken. Cook for two minutes. Brush the new top side with more glaze. Flip again. You're building layers of lacquered flavor.
Keep your heat at medium-high but watch for burning. The sugar in the glaze walks a fine line between caramelized and scorched. Adjust as needed. - 6
Finish the chicken
Continue glazing and flipping every minute or so, three to four more times total. The chicken is done when it reaches 165°F internally and the exterior shows a deep mahogany color with sticky, slightly charred edges. The surface should look lacquered, almost shiny. Total cooking time runs about ten to twelve minutes. Transfer to a cutting board and let rest for three minutes.
- 7
Toast the buns
While the chicken rests, split the buns and toast them cut-side down in the same skillet, pressing gently. The residual teriyaki on the pan will flavor the bread. Toast just until golden with a few darker spots, about one minute. The exterior should crisp while the interior stays pillowy.
- 8
Slice the chicken
Slice each chicken thigh against the grain into strips about half an inch wide. Cutting against the grain shortens the muscle fibers and makes each bite more tender. Toss the sliced chicken with a spoonful of the reserved finishing sauce to add one final layer of glaze.
- 9
Assemble the sandwiches
Spread mayonnaise generously on both cut sides of each toasted bun. Pile the sliced teriyaki chicken on the bottom halves, letting the pieces overlap and tumble naturally. Drizzle with more reserved sauce. Top with a generous handful of shredded iceberg lettuce, pressing it gently into the chicken. Scatter sesame seeds and sliced green onions over the lettuce. Crown with the top bun and press down just enough to compress slightly.
The ratio matters. You want enough lettuce to provide crunch and coolness but not so much that it overwhelms the chicken. About a quarter cup per sandwich strikes the balance. - 10
Serve immediately
These sandwiches are best eaten within minutes of assembly, while the chicken is still warm and the bun hasn't absorbed too much sauce. Serve with extra teriyaki on the side for dipping and plenty of napkins. This is honest, messy food.
Chef Tips
- •Japanese mayonnaise (Kewpie) has a richer, slightly sweeter flavor than American mayo thanks to rice vinegar and egg yolks only. Find it in Asian grocery stores or online. Regular mayonnaise works, but you'll notice the difference.
- •For transporting these sandwiches to a picnic or work lunch, pack the components separately: chicken in one container with sauce drizzled over, shredded lettuce in a bag, toasted buns in another. Assemble just before eating to prevent sogginess.
- •The teriyaki sauce recipe makes slightly more than you need. The extra keeps refrigerated for two weeks and works beautifully on grilled salmon, pork chops, or tossed with stir-fried vegetables.
- •If you can find it, look for a brioche-style burger bun. The slight sweetness echoes the teriyaki glaze and the tender crumb absorbs sauce without falling apart.
Advance Preparation
- •The teriyaki sauce can be made up to one week ahead and refrigerated. It will thicken as it cools; warm gently before using.
- •Chicken can be pounded and seasoned up to four hours ahead, kept refrigerated on a plate covered with plastic wrap.
- •For meal prep, cook the chicken through step 6 and refrigerate. Reheat gently in a skillet with a splash of sauce before slicing and assembling.
Frequently Asked Questions
Nutrition Information
1 serving (about 215g)
Where cooking meets culture.
Culinary mentorship, cultural storytelling, and the editorial depth that makes cooking meaningful.
Explore Culinary Advisor