Culinary Advisor
A cooking platform built around craft, culture, and the stories behind what we eat.
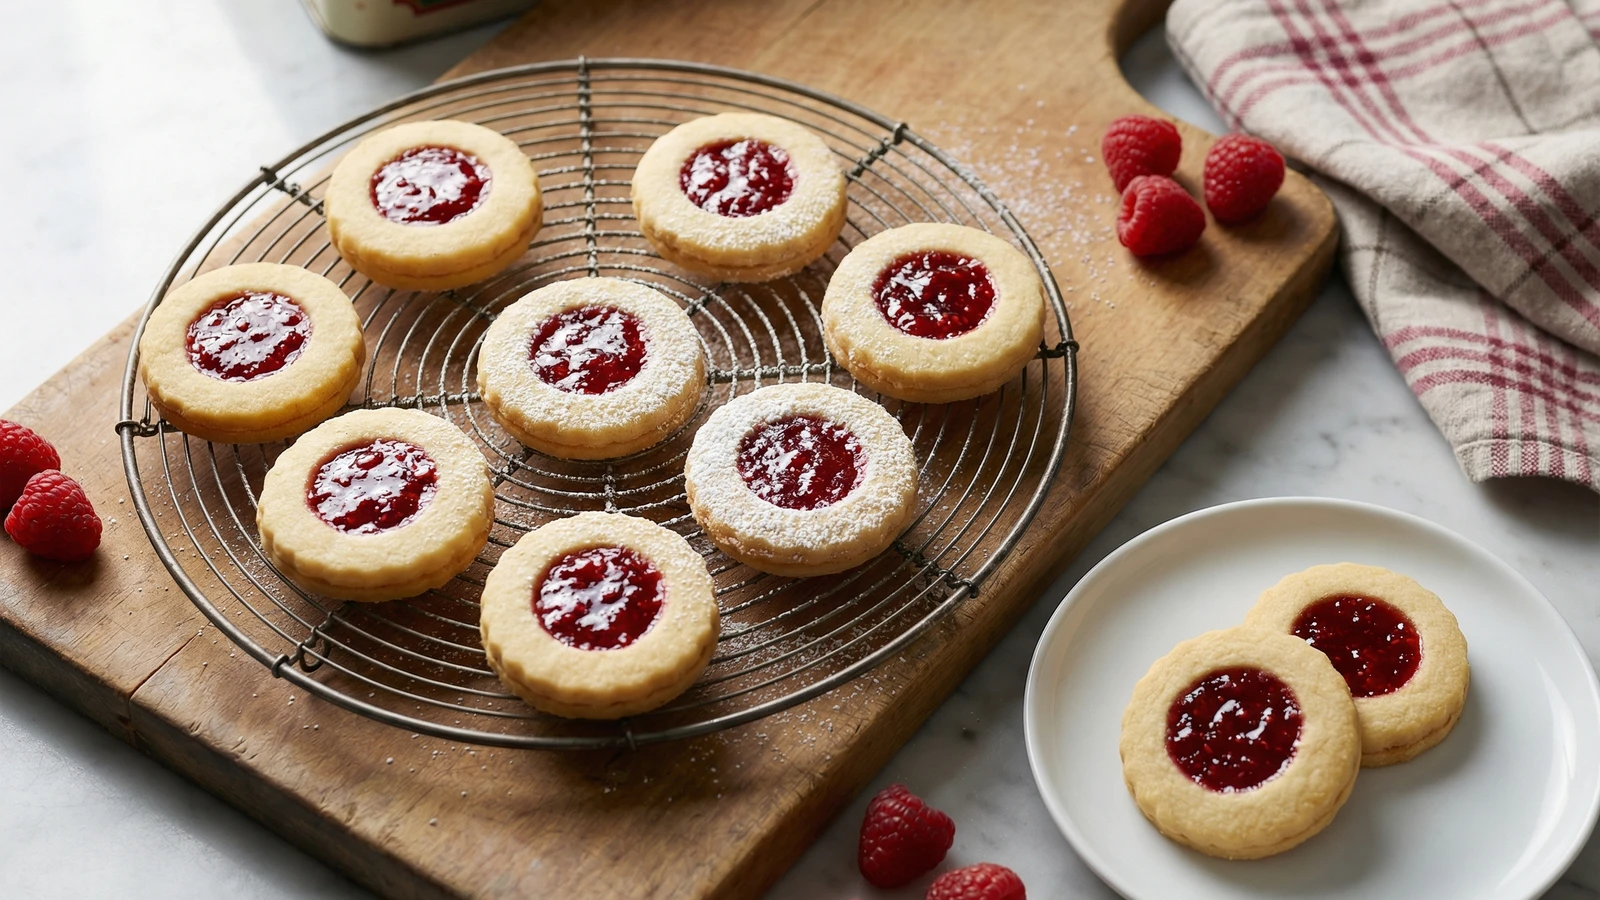
Raspberry Thumbprint Cookies
Created by
Tender, buttery shortbread cookies cradling pools of jewel-bright raspberry jam, their golden edges and crimson centers making them the quiet stars of any holiday cookie platter.
Every family has a cookie that signals the holidays have truly begun. For many American households, it's the thumbprint. This humble little cookie, pressed with nothing fancier than your own thumb, has graced church bake sales and grandmother's tins since the 1930s. Some food historians trace its roots to Swedish hallongrotta. Others point to Austrian Linzer traditions. But like most American classics, the thumbprint became something entirely its own once it crossed the Atlantic and settled into our holiday rituals.
The beauty of this cookie lies in its honesty. There's no architectural wizardry, no piped frosting demanding steady hands. Just butter, flour, sugar, and a well of bright raspberry jam that glistens like a tiny stained glass window. Children can shape the balls and press the centers. Adults can trust the results. Everyone gathers around the cooling rack to steal one before they've properly set.
I've made thousands of these over the years, and I'll tell you the secret isn't in any single ingredient. It's in the temperature of your butter and the restraint of your hands. Work the dough just until it comes together. Press your thumb firmly but without violence. Fill the wells generously but not recklessly. These small acts of attention transform simple ingredients into something people remember long after the holidays end.
Make a double batch. You'll thank me when the first tin disappears within hours.
The technique, the tradition, and the story behind every dish.
Discover Culinary AdvisorIngredients
unsalted butter, at cool room temperature
Quantity
226g (1 cup / 2 sticks)
granulated sugar
Quantity
100g (1/2 cup)
fine sea salt
Quantity
1/2 teaspoon
large egg yolks, at room temperature
Quantity
2
pure vanilla extract
Quantity
1 teaspoon
almond extract
Quantity
1/4 teaspoon
all-purpose flour
Quantity
280g (2 1/4 cups)
raspberry jam or preserves
Quantity
150g (1/2 cup)
| Ingredient | Quantity |
|---|---|
| unsalted butter, at cool room temperature | 226g (1 cup / 2 sticks) |
| granulated sugar | 100g (1/2 cup) |
| fine sea salt | 1/2 teaspoon |
| large egg yolks, at room temperature | 2 |
| pure vanilla extract | 1 teaspoon |
| almond extract | 1/4 teaspoon |
| all-purpose flour | 280g (2 1/4 cups) |
| raspberry jam or preserves | 150g (1/2 cup) |
Equipment Needed
- •Stand mixer with paddle attachment (or hand mixer)
- •Two rimmed baking sheets
- •Parchment paper
- •Wire cooling rack
- •1-inch cookie scoop or tablespoon measure
- •Wine cork or 1/2 teaspoon measure for pressing wells
Instructions
- 1
Cream butter and sugar
Place the butter in the bowl of a stand mixer fitted with the paddle attachment. Beat on medium speed until smooth and slightly lightened, about 1 minute. Add the sugar and salt. Continue beating until the mixture is fluffy and pale, scraping down the bowl once, about 2 minutes total. You're not looking for volume here as you would with a cake. You want smoothness and a texture like thick frosting.
Cool room temperature means the butter yields slightly when pressed but doesn't feel soft or greasy. Around 65°F is ideal. If your butter is too warm, the cookies will spread too much and lose their shape. - 2
Add yolks and extracts
Add the egg yolks, vanilla extract, and almond extract to the butter mixture. Beat on medium-low until fully incorporated, about 30 seconds. Scrape down the bowl. The mixture should look smooth and slightly glossy, with no visible streaks of yolk.
- 3
Mix in the flour
Add the flour all at once. Mix on low speed just until the dough comes together and no dry streaks remain. This takes 30 to 45 seconds. Stop the mixer the moment it forms a cohesive mass. The dough will look slightly shaggy. That's perfect. Overworking develops gluten, which makes cookies tough instead of tender.
If you don't have a stand mixer, use a hand mixer or work by hand with a wooden spoon. The goal is the same: combine without overworking. - 4
Chill the dough
Turn the dough onto a clean work surface and press it together into a flat disk about 1 inch thick. Wrap tightly in plastic and refrigerate for at least 30 minutes and up to 2 days. The dough needs to firm up so the cookies hold their shape in the oven. Don't skip this step.
- 5
Prepare for baking
Position racks in the upper and lower thirds of your oven. Heat to 350°F (175°C). Line two baking sheets with parchment paper. Stir the raspberry jam in its jar to loosen it, then transfer to a small bowl. If the jam has large fruit pieces, press it through a fine-mesh sieve for a smoother fill. You want it fluid enough to settle into the wells but thick enough not to run everywhere.
- 6
Shape the cookies
Remove the dough from the refrigerator. Scoop level tablespoons of dough and roll between your palms into smooth balls about 1 inch in diameter. Place them 2 inches apart on the prepared baking sheets. Work quickly. If the dough becomes too soft and sticky, return it to the refrigerator for 10 minutes before continuing.
- 7
Create the thumbprint wells
Using your thumb, the back of a rounded 1/2 teaspoon measuring spoon, or a wine cork, press a deep well into the center of each ball. Push about halfway down, rotating gently to widen the depression without cracking the edges. If cracks form, pinch them closed with your fingers. The wells will shrink slightly during baking, so make them generous.
A wine cork dipped in flour creates perfectly uniform wells every time. This small detail makes your cookies look like they came from a professional bakery. - 8
Fill with jam
Spoon approximately 1/2 teaspoon of raspberry jam into each well. You want the wells generously filled but not overflowing. The jam will bubble and set during baking. Resist the temptation to overfill. Jam that spills over will burn and stick to the parchment.
- 9
Bake until golden
Slide both baking sheets into the oven. Bake for 12 to 14 minutes, rotating the sheets from top to bottom and front to back at the halfway point. The cookies are done when the edges turn light golden and the jam is bubbling gently. The centers will look slightly underdone. They'll firm as they cool. Trust your eyes and nose. You'll smell butter and toasted flour when they're ready.
- 10
Cool completely
Let the cookies rest on the baking sheets for 5 minutes. The jam is molten lava at this point. Moving them too soon risks burns and breakage. After 5 minutes, transfer carefully to a wire rack to cool completely, at least 20 minutes. The jam will transform from liquid to a glossy, slightly tacky jewel. Only then are they ready for eating or storing.
Chef Tips
- •Buy the best raspberry jam you can find, or make your own. The cookie itself is intentionally subtle. It exists to frame and support the jam. Cheap, overly sweet preserves will disappoint. Look for jam with visible seeds and a true berry flavor, not candy sweetness.
- •The almond extract is traditional and adds a subtle complexity that pairs beautifully with raspberry. If you have a nut allergy or simply prefer a purer butter flavor, omit it entirely and increase the vanilla to 1 1/2 teaspoons.
- •For gift giving, layer cookies between sheets of wax paper in a decorative tin. They look stunning arranged in a single layer on a parchment-lined box with a ribbon. These are the cookies that make people feel remembered.
- •You can vary the jam to suit the season or your pantry. Apricot, strawberry, blackberry, and cherry all work beautifully. For a sophisticated twist, try fig preserves or even lemon curd. Just avoid anything too runny.
Advance Preparation
- •The dough can be made, wrapped, and refrigerated for up to 3 days before shaping and baking. Let it soften at room temperature for 10 minutes if too firm to roll.
- •Shaped dough balls can be frozen on a baking sheet, then transferred to a freezer bag for up to 2 months. Bake from frozen, adding 2 to 3 minutes to the bake time. Press the wells and add jam just before baking.
- •Baked cookies keep beautifully at room temperature in an airtight container for up to 1 week. Do not refrigerate, as this will make the cookie texture dry and the jam weep. For longer storage, freeze baked cookies for up to 2 months, layered between parchment.
Frequently Asked Questions
Nutrition Information
1 serving (about 31g)
Where cooking meets culture.
Culinary mentorship, cultural storytelling, and the editorial depth that makes cooking meaningful.
Explore Culinary Advisor