Culinary Advisor
A cooking platform built around craft, culture, and the stories behind what we eat.
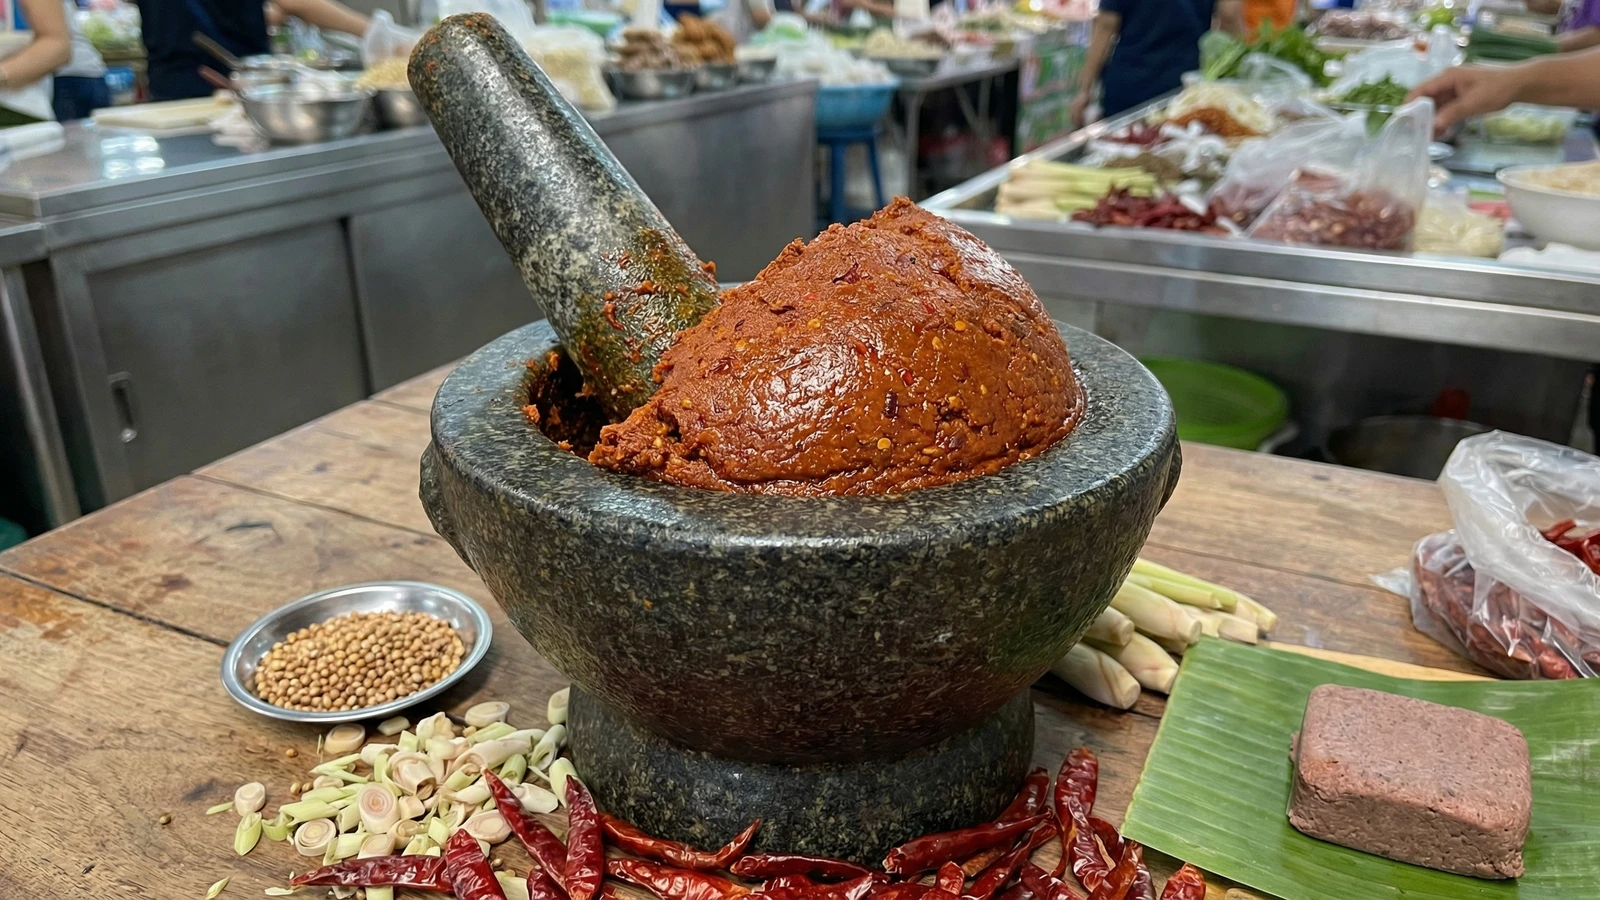
Dry Curry Paste (Prik Gaeng Kua)
Created by
The densest, driest paste in the Thai system. Built for choo chee curries and prik khing stir-fries, pounded without a drop of water, because moisture is the enemy of concentration.
Every paste in Thai cooking follows the same logic. Hardest ingredients first. Most delicate last. Pound until the mortar tells you it's done. Prik gaeng kua is that logic stripped to its most concentrated form.
Ajarn always said: "The kreung tam is everything." He meant it literally. Without the paste, there is no Thai dish. And this paste, the dry curry paste, is the kreung tam at its most disciplined. No water. No liquid of any kind touches this mortar. Every other paste allows a splash to help things along. Not this one. The density is the point. You're building a paste so concentrated that when it hits cracked coconut cream, it can stand up to the fat without dissolving into nothing. That's what makes choo chee coating-thick and prik khing bone-dry.
Here's what separates gaeng kua from red curry paste, because people confuse them constantly. Red curry paste (prik gaeng phet) uses fresh red chilies alongside dried ones, and it's looser, designed for soupy curries with coconut milk. Gaeng kua uses only dried chilies (prik chi fa haeng). All dried. The result is deeper in color, more concentrated in flavor, and denser in texture. The dried chilies bring a roasted, slightly smoky sweetness that fresh chilies can't touch. Different paste, different purpose, same principles.
I teach this paste first at Fai Thai workshops because it forces discipline. You can't cheat it. If your mortar technique is lazy, the paste stays chunky and the curry breaks. If you add water because your arm hurts, the paste is too loose and won't fry properly. The krok doesn't lie. It shows you exactly where your technique stands. Krok ก่อน, krok ก่อน.
Prik gaeng kua is a Central Thai paste with roots in the Bangkok court and merchant kitchens of the Chao Phraya River basin. The word 'kua' (คั่ว) means 'to dry-roast' or 'to stir in a dry pan,' reflecting the paste's intended use in preparations where coconut cream is reduced until the oil separates and the curry becomes thick and glossy rather than soupy. Choo chee, the paste's signature dish, was historically a method for preparing river fish with thick curry sauce, while prik khing (literally 'ginger chili') adapted the paste for dry stir-fries with long beans, a preparation that likely evolved from Chinese-Thai culinary exchange in the 19th century.
The technique, the tradition, and the story behind every dish.
Discover Culinary AdvisorIngredients
large dried red chilies (prik chi fa haeng)
Quantity
15
seeded, soaked in warm water 15 minutes, squeezed dry
white peppercorns (prik thai)
Quantity
1 tablespoon
coriander seeds (met phak chi)
Quantity
1 tablespoon
toasted in dry pan until fragrant
cumin seeds (yira)
Quantity
1 teaspoon
toasted in dry pan until fragrant
galangal (kha)
Quantity
1 tablespoon
thinly sliced
lemongrass (takhrai)
Quantity
2 stalks
tender inner core only, thinly sliced
kaffir lime zest (phiu makrut)
Quantity
1 tablespoon
finely minced
cilantro roots (rak phak chi)
Quantity
4
scraped clean and chopped
garlic (kratiam)
Quantity
8 cloves
shallots (hom daeng)
Quantity
6
roughly chopped
shrimp paste (kapi)
Quantity
1 tablespoon
salt
Quantity
1 teaspoon
| Ingredient | Quantity |
|---|---|
| large dried red chilies (prik chi fa haeng)seeded, soaked in warm water 15 minutes, squeezed dry | 15 |
| white peppercorns (prik thai) | 1 tablespoon |
| coriander seeds (met phak chi)toasted in dry pan until fragrant | 1 tablespoon |
| cumin seeds (yira)toasted in dry pan until fragrant | 1 teaspoon |
| galangal (kha)thinly sliced | 1 tablespoon |
| lemongrass (takhrai)tender inner core only, thinly sliced | 2 stalks |
| kaffir lime zest (phiu makrut)finely minced | 1 tablespoon |
| cilantro roots (rak phak chi)scraped clean and chopped | 4 |
| garlic (kratiam) | 8 cloves |
| shallots (hom daeng)roughly chopped | 6 |
| shrimp paste (kapi) | 1 tablespoon |
| salt | 1 teaspoon |
Equipment Needed
- •Heavy granite mortar and pestle (krok hin), at least 7 inches diameter
- •Small dry pan for toasting spices
Instructions
- 1
Toast the dry spices
Put the coriander seeds and cumin seeds in a dry pan over medium heat. Shake the pan. Keep it moving. Within two minutes the kitchen will smell like a spice market. The coriander seeds darken slightly and the cumin turns a shade deeper. That's it. Pull them off the heat immediately. Burnt spices are bitter spices and there's no fixing that. Let them cool completely before pounding.
Toasting is not optional. Raw coriander and cumin taste flat and dusty. Toasting activates the volatile oils locked inside the seed. Two minutes of heat transforms them. This is science, not tradition for tradition's sake. - 2
Prepare the dried chilies
Remove the stems and shake out the seeds from the dried chilies. Soak them in warm water for 15 minutes until they're pliable. Then squeeze them dry. Really squeeze. Wring them out like a towel. Every drop of water you leave in the chili becomes water in your paste, and this paste takes no water. The whole point of prik gaeng kua is density. Wet chilies make loose paste. Loose paste makes bad curry.
Use prik chi fa haeng (large dried red chilies), not prik khi nu haeng (dried bird's eye). Prik chi fa gives color, body, and moderate heat. Bird's eye gives only brutality. This paste needs depth, not just fire. - 3
Pound the hardest ingredients
Start with the salt and white peppercorns in the granite mortar. Pound until the peppercorns are crushed to powder. The salt acts as an abrasive, helping break down the hard spices. Add the toasted coriander and cumin. Pound again to a fine powder. This is the driest, hardest layer. It goes first because these ingredients need the most force and the most time. You should have a fragrant spice powder with no whole pieces remaining.
Ajarn always said: the order ingredients enter the mortar is not a suggestion. It's physics. Hard and dry first, because they need the most impact. Soft and wet last, because they'd cushion the blow and prevent the hard ingredients from breaking down. - 4
Add the fibrous aromatics
Add the sliced galangal to the mortar. Pound it into the spice powder until the fibers break down and it integrates. Galangal is stubborn. It's the toughest aromatic in the Thai kitchen. Give it time. Next, add the lemongrass. Pound until it disappears into the paste. Then the kaffir lime zest. Each addition should be fully incorporated before the next goes in. You're building layers, not dumping everything in at once. The paste should be getting visibly wetter and more cohesive, pulling together into a rough mass.
Slice the galangal and lemongrass as thin as possible before they go in the mortar. You're giving yourself a head start. The mortar is powerful, but it's not magic. Thick chunks of galangal will fight you for twenty minutes. - 5
Incorporate the roots
Add the cilantro roots and pound them in. Cilantro root (rak phak chi) is one of Ajarn's nine essential ingredients. It provides an earthy, grounding depth that nothing else replicates. Cilantro stems are not a substitute. The root has a different chemical profile, more concentrated, less grassy. Pound until the root fibers are completely broken down and the paste is becoming smoother.
- 6
Add the squeezed chilies
Now the dried chilies go in. Add them in batches of five. Pound each batch into the paste before adding the next. The chilies bring the color, the body, and the backbone heat of the paste. Because you squeezed them dry, they'll integrate into the paste without loosening the texture. After all fifteen are pounded in, the paste should be deep brick-red and noticeably denser. This is the moment the paste starts looking like a paste.
If the paste starts climbing the sides of the mortar and refuses to come together, scrape it down with a spoon and keep pounding. Don't add water. Resist. The paste consolidates as the cell walls continue to break and release their own moisture. Trust the process. - 7
Pound in garlic and shallots
Add the garlic cloves. Pound until they dissolve into the paste. Then the chopped shallots, in two batches. Garlic and shallots are the wettest ingredients in the paste, which is why they go near the end. Their moisture helps bind everything together, but only after the dry and fibrous ingredients have already been broken down. The paste should be turning glossy and cohesive, holding together when you press it against the side of the mortar.
- 8
Finish with shrimp paste
Last ingredient: kapi (shrimp paste). Add it and pound it through the paste until it's completely uniform. Kapi goes last because it's soft and would cushion the impact if added earlier. It provides the umami foundation, that deep, fermented savoriness that ties every element together. When the paste is done, it should be smooth, dense, and hold its shape on the pestle. Lift the pestle. If the paste clings to it and doesn't drip, you're there. The aroma should fill the room: roasted spices, chili, shrimp paste, lemongrass. That's the kreung tam telling you it's ready.
Good kapi smells pungent but clean, like the ocean concentrated. Bad kapi smells rotten. If your shrimp paste makes you recoil, get better shrimp paste. Thai brands like Pantainorasingh or Tra Chang are reliable.
Chef Tips
- •The difference between prik gaeng kua and prik gaeng phet (red curry paste) confuses everyone. Red curry paste uses fresh red chilies and dried chilies together, and it's designed for wet curries with coconut milk. Gaeng kua uses only dried chilies and is built for dry applications where the paste fries in coconut cream until the oil splits. Different tools for different jobs. Know which paste you need before you start pounding.
- •This paste is the foundation for two essential Central Thai dishes. Choo chee: fry the paste in thick coconut cream until fragrant and the oil separates, add fish, coat with the sauce, finish with kaffir lime leaf chiffonade and fresh prik chi fa. Prik khing: fry the paste dry in oil (no coconut cream), add your protein and long beans, season with fish sauce and a touch of sugar. Same paste, two completely different dishes. That's the system at work.
- •When you fry this paste in coconut cream, wait for the oil to separate. This is called 'cracking' the coconut cream (แตกมัน, taek man). The thick head of the coconut cream goes in first, the paste gets fried in it, and you wait. The cream will look broken and the oil will pool on the surface in red-orange rivulets. That's the signal. If you add the protein before the crack, your curry tastes flat. Patience.
- •Do not use a blender. I know your arm hurts. A blender chops the cell walls with a blade. A mortar crushes them with pressure. Crushed cells release essential oils gradually, which is why mortar-pounded paste has a rounder, deeper aroma that develops over time. Blended paste releases everything at once and fades. Ajarn taught me this on day one. It's not romantic nostalgia. It's physics.
Advance Preparation
- •Prik gaeng kua stores beautifully. Portion it into ice cube trays, freeze, then transfer to a sealed bag. Each cube is roughly one tablespoon, enough for one serving of choo chee or prik khing. Frozen paste keeps for 3 months without losing potency.
- •In the refrigerator, the paste keeps for 5-7 days in an airtight container with a thin layer of oil on top to prevent oxidation. The color darkens slightly but the flavor holds.
- •Toast the coriander and cumin seeds ahead of time. They can sit in a sealed jar for weeks. But once the paste is pounded, the clock starts. Fresh paste is always better than paste that's been sitting.
Frequently Asked Questions
Nutrition Information
1 serving (about 35g)
Where cooking meets culture.
Culinary mentorship, cultural storytelling, and the editorial depth that makes cooking meaningful.
Explore Culinary Advisor