Culinary Advisor
A cooking platform built around craft, culture, and the stories behind what we eat.
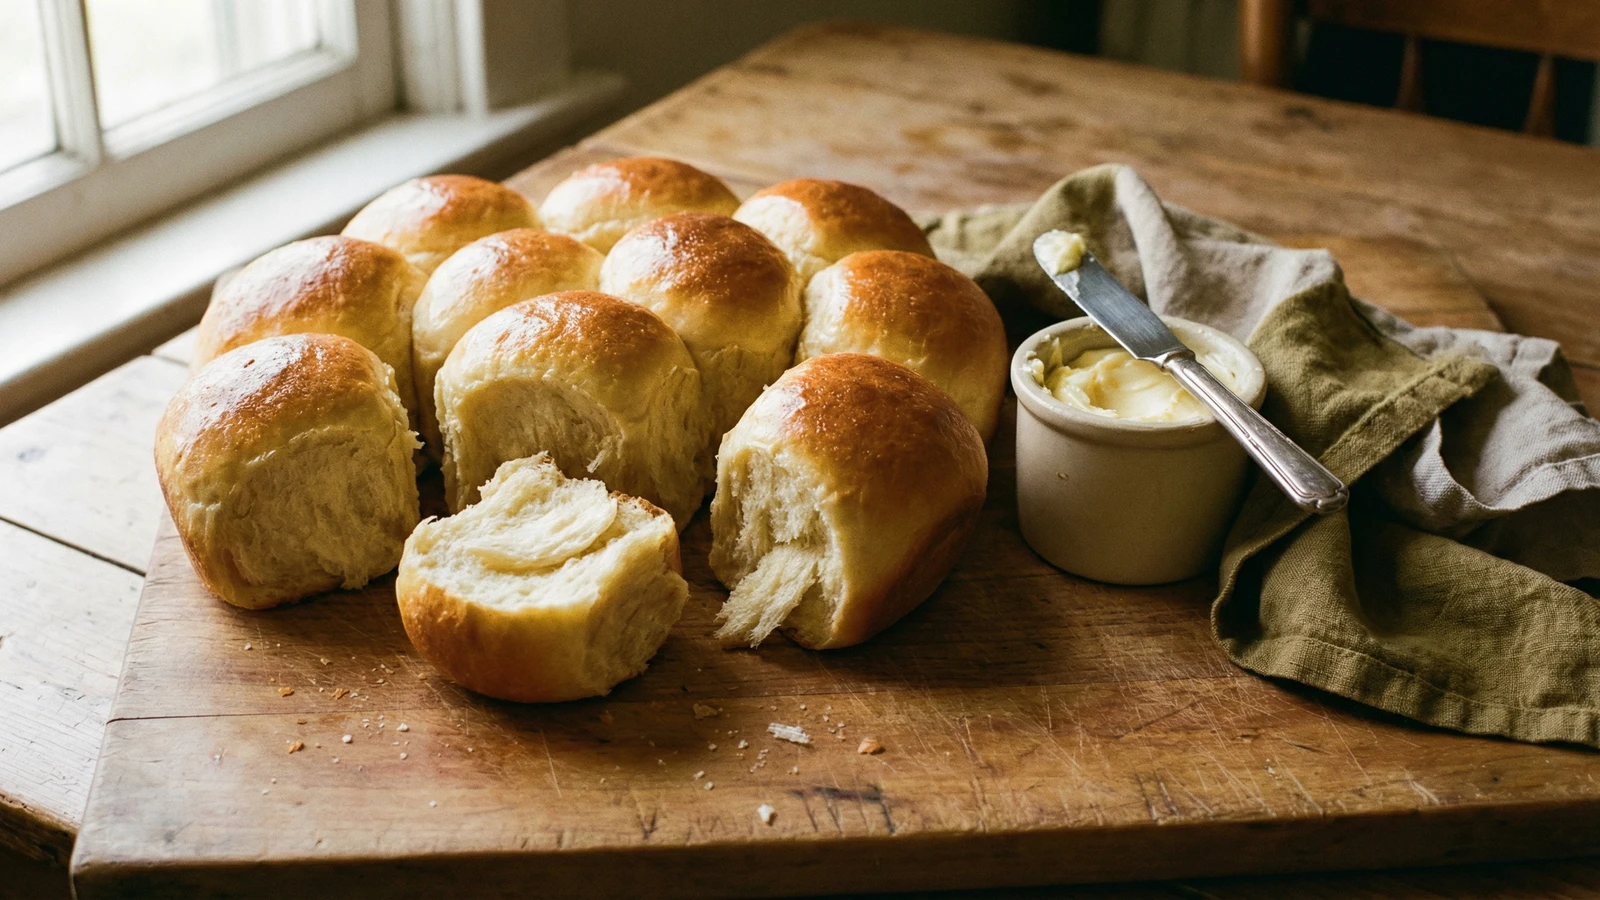
Parker House Rolls
Created by Chef Ally
Soft, folded dinner rolls brushed with butter before and after baking, each one pulling away from the next in that satisfying way that makes everyone reach for a second.
Start with the flour. Stone-ground from a mill you trust, with the faint sweetness of wheat still present. Industrial flour works, but good flour transforms bread into something worth remembering. The difference is not dramatic. It is quiet, honest, and completely worth seeking out.
Parker House rolls were born in Boston in the 1870s, an accident that became an institution. A cook folded dough in frustration and created something more beautiful than what he intended. That fold is everything here. It creates a pocket that holds butter, a seam where the bread pulls apart with almost no resistance, an invitation to tear and share.
This is simple bread. Flour, milk, butter, yeast, a little sugar, eggs, and time. The technique asks only for patience and attention. Watch the dough as it rises. Touch it. Learn what alive dough feels like under your hands. Every batch teaches you something.
These rolls belong on every holiday table, but they do not need an occasion. Make them for Tuesday dinner. Make them because you want the house to smell like butter and yeast. Make them because bread made with your hands is different from bread made by machines.
The technique, the tradition, and the story behind every dish.
Discover Culinary AdvisorIngredients
whole milk
Quantity
1 cup (240ml)
warmed to about 110°F
active dry yeast
Quantity
2 1/4 teaspoons (1 packet)
granulated sugar
Quantity
1/4 cup (50g)
unbleached all-purpose flour
Quantity
4 cups (500g)
preferably stone-ground
fine sea salt
Quantity
1 1/2 teaspoons
large eggs
Quantity
2
at room temperature
unsalted butter (for dough)
Quantity
8 tablespoons (1 stick/113g)
softened
unsalted butter (for brushing)
Quantity
6 tablespoons
melted
| Ingredient | Quantity |
|---|---|
| whole milkwarmed to about 110°F | 1 cup (240ml) |
| active dry yeast | 2 1/4 teaspoons (1 packet) |
| granulated sugar | 1/4 cup (50g) |
| unbleached all-purpose flourpreferably stone-ground | 4 cups (500g) |
| fine sea salt | 1 1/2 teaspoons |
| large eggsat room temperature | 2 |
| unsalted butter (for dough)softened | 8 tablespoons (1 stick/113g) |
| unsalted butter (for brushing)melted | 6 tablespoons |
Equipment Needed
- •Large mixing bowl
- •3-inch round biscuit cutter or drinking glass
- •Rolling pin
- •9x13 inch baking dish or half sheet pan
- •Pastry brush for butter
Instructions
- 1
Wake the yeast
Pour the warm milk into a large bowl. It should feel like bathwater against your wrist, neither cool nor hot. Sprinkle the yeast and a pinch of the sugar over the surface. Let it sit undisturbed for five to ten minutes. The yeast will bloom into a creamy, fragrant foam. If nothing happens, your yeast is tired. Start again with fresh.
Milk temperature matters. Too hot kills the yeast; too cold leaves it dormant. Your instinct will develop with practice. - 2
Build the dough
Add the remaining sugar, eggs, and softened butter to the yeast mixture. Whisk until the butter breaks into small pieces and the eggs are incorporated. Add the flour and salt. Stir with a wooden spoon until a shaggy mass forms and no dry pockets remain. The dough will look rough. That is right.
- 3
Knead until smooth
Turn the dough onto a lightly floured surface. Knead for eight to ten minutes, pushing with the heel of your hand, folding, turning. At first it will stick and resist. Keep going. The dough transforms, becoming smooth, supple, and slightly tacky but no longer sticky. When you poke it, the indentation should spring back slowly.
Add flour sparingly. A slightly tacky dough makes tender rolls. Too much flour creates dense bread. - 4
First rise
Place the dough in a lightly buttered bowl, turning once to coat all sides. Cover with a clean kitchen towel or plastic wrap. Set in a warm spot, away from drafts, and let it double in size. This takes about one to one and a half hours, depending on the warmth of your kitchen. The dough is ready when you press two fingers into it and the indentations remain.
A turned-off oven with just the light on creates a perfect proofing environment, around 75 to 80 degrees. - 5
Shape the rolls
Punch down the risen dough gently to release the gas. Turn it onto a lightly floured surface and roll it out to about half an inch thick. Using a three-inch round cutter or the rim of a drinking glass, cut circles as close together as possible. Gather scraps, let them rest five minutes, roll, and cut again.
- 6
Create the fold
Brush each circle with melted butter. Using the back of a butter knife or a chopstick, press a deep crease just off center, creating an indentation but not cutting through. Fold the larger half over the smaller, pressing the edges gently so they hold but do not seal completely. The fold is the soul of a Parker House roll. It creates that pocket that catches butter.
- 7
Second rise
Arrange the folded rolls in a buttered 9x13 inch baking dish, sides barely touching. They will grow together as they proof. Cover loosely and let rise until puffy and nearly doubled, about forty-five minutes to one hour. The rolls should look alive, pillowy, and eager.
- 8
Bake until golden
Preheat your oven to 375°F. Brush the tops of the risen rolls generously with melted butter. Bake for fifteen to eighteen minutes, rotating the pan halfway through, until the tops are deep golden brown and the rolls sound hollow when you tap them. The kitchen will smell of butter and yeast, the promise of good bread.
Trust your eyes and nose more than the timer. Ovens vary. Golden tops and that unmistakable bread fragrance tell you when they are ready. - 9
Finish with more butter
The moment the rolls emerge from the oven, brush them again with the remaining melted butter. Be generous. The hot bread absorbs it immediately, creating a glossy, irresistible surface. Let the rolls cool for five minutes in the pan, then serve warm. They are meant to be pulled apart and passed around the table.
Chef Tips
- •Seek out flour from a regional mill if you can find one. King Arthur is widely available and reliable. The flour matters more than any technique.
- •Butter should be European-style with higher fat content if you can find it. The flavor carries through to the finished roll.
- •These rolls forgive imperfect shaping. Each one will look slightly different, and that is part of their beauty. Do not fuss over uniformity.
- •If your kitchen runs cold, warm the oven to 200°F, turn it off, and let the dough rise inside with the door cracked. The gentle warmth helps.
- •Leftover rolls reheat beautifully. Wrap in foil and warm at 350°F for five to eight minutes. Brush with more butter because why not.
Advance Preparation
- •Dough can be made through the first rise, then refrigerated overnight. It will rise slowly in the cold. Bring to room temperature for about an hour before shaping.
- •Shaped rolls can be frozen before the second rise. Place the pan in the freezer until rolls are solid, then transfer to a freezer bag. Thaw overnight in the refrigerator, let rise at room temperature, and bake as directed.
- •Baked rolls keep at room temperature, covered, for two days. They are best fresh, but they still bring joy the next morning split and toasted.
Frequently Asked Questions
Nutrition Information
1 serving (about 45g)
Where cooking meets culture.
Culinary mentorship, cultural storytelling, and the editorial depth that makes cooking meaningful.
Explore Culinary Advisor