Culinary Advisor
A cooking platform built around craft, culture, and the stories behind what we eat.
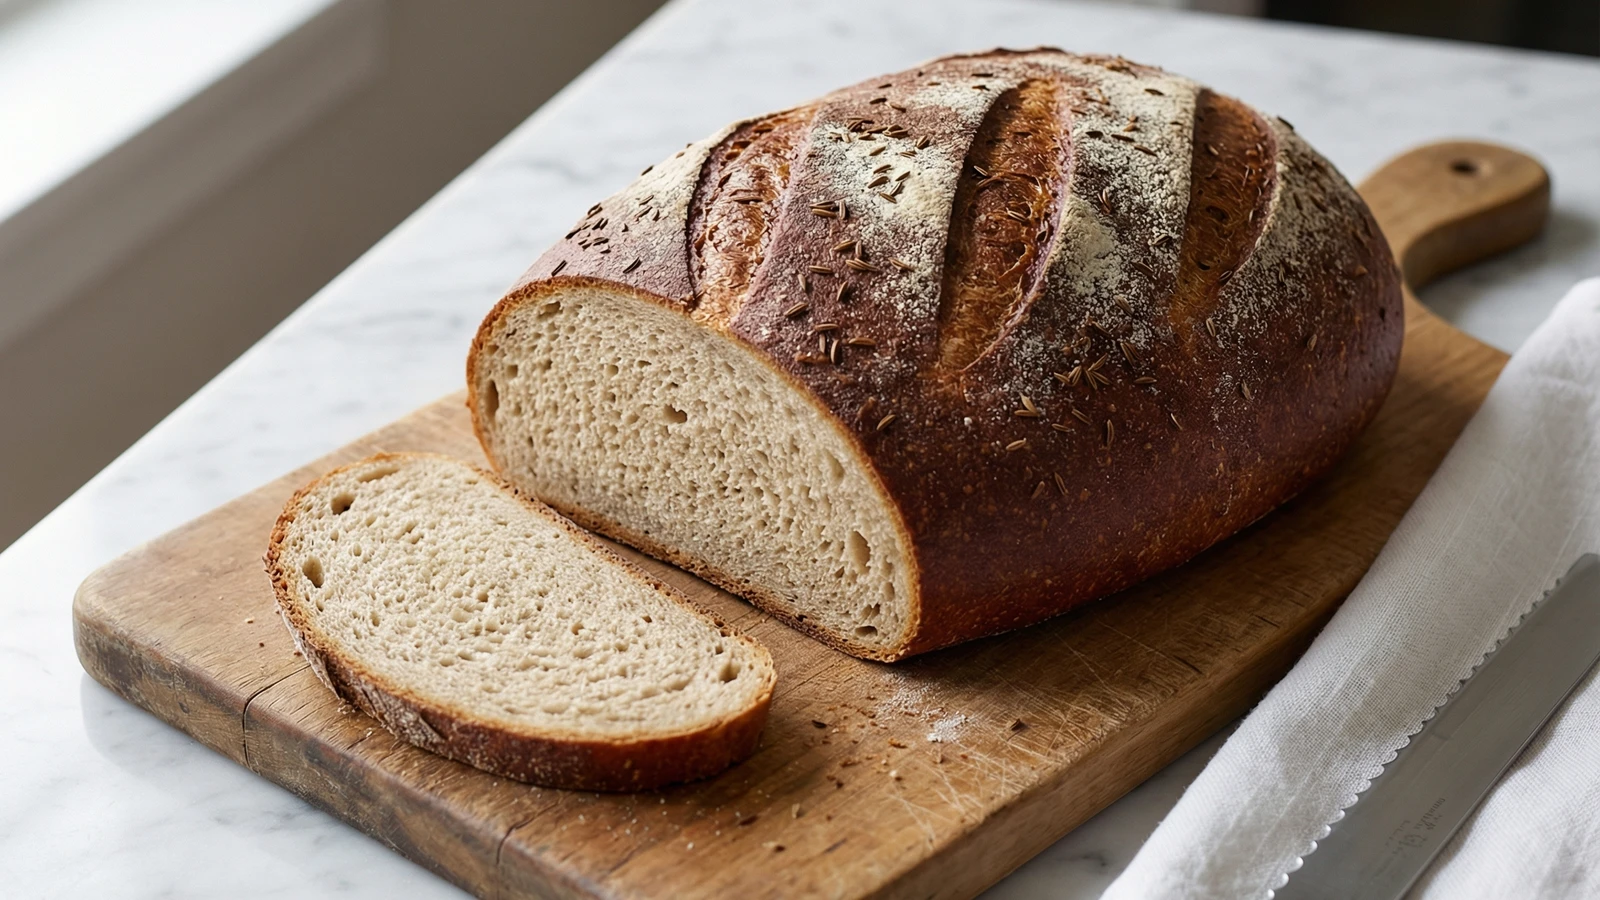
New York Deli Rye Bread
Created by
The real thing: a chewy, caraway-flecked loaf with honest tang and a crackly crust that shatters under the knife. This is the bread that built the great delis of New York.
The great Jewish delis of the Lower East Side were built on three pillars: cured meat, sharp mustard, and proper rye bread. You can source the first two. The bread you make yourself.
This is not the soft, flabby rye you find wrapped in plastic at the supermarket. Real deli rye has character. It has a crust that resists the knife before yielding with a satisfying crack. The crumb is chewy and slightly dense, sturdy enough to hold a pile of pastrami without collapsing into mush. And that tang, that subtle sourness that makes your mouth water before you even take a bite, comes from a slow overnight fermentation that builds flavor the old-fashioned way.
I've eaten rye bread in delis from Katz's to the Carnegie, from Langer's in Los Angeles to Manny's in Chicago. The best versions share this quality: they taste like they took time. Because they did. An overnight sponge does the heavy lifting, developing the complex flavors that instant yeast alone cannot achieve. Your active work amounts to thirty minutes spread across two days. The rest is patience.
Don't let the two-day timeline intimidate you. Bread baking is mostly waiting. You mix a simple sponge before bed, finish the dough the next morning, and pull a beautiful loaf from the oven by afternoon. The smell alone will make you wonder why you ever bought bread from a store.
The technique, the tradition, and the story behind every dish.
Discover Culinary AdvisorIngredients
medium rye flour (sponge)
Quantity
100g (3/4 cup)
bread flour (sponge)
Quantity
50g (1/3 cup)
warm water, about 90°F (sponge)
Quantity
150g (2/3 cup)
instant yeast (sponge)
Quantity
1/4 teaspoon
bread flour (dough)
Quantity
300g (2 1/4 cups)
medium rye flour (dough)
Quantity
100g (3/4 cup)
warm water, about 90°F (dough)
Quantity
100g (scant 1/2 cup)
instant yeast (dough)
Quantity
1 1/2 teaspoons
fine sea salt
Quantity
10g (2 teaspoons)
caraway seeds
Quantity
2 tablespoons, plus more for topping
unsulfured molasses
Quantity
1 tablespoon
vegetable oil
Quantity
1 tablespoon
cornmeal
Quantity
for baking sheet
cornstarch
Quantity
1 tablespoon
mixed with 1/2 cup water for glaze
| Ingredient | Quantity |
|---|---|
| medium rye flour (sponge) | 100g (3/4 cup) |
| bread flour (sponge) | 50g (1/3 cup) |
| warm water, about 90°F (sponge) | 150g (2/3 cup) |
| instant yeast (sponge) | 1/4 teaspoon |
| bread flour (dough) | 300g (2 1/4 cups) |
| medium rye flour (dough) | 100g (3/4 cup) |
| warm water, about 90°F (dough) | 100g (scant 1/2 cup) |
| instant yeast (dough) | 1 1/2 teaspoons |
| fine sea salt | 10g (2 teaspoons) |
| caraway seeds | 2 tablespoons, plus more for topping |
| unsulfured molasses | 1 tablespoon |
| vegetable oil | 1 tablespoon |
| cornmeal | for baking sheet |
| cornstarchmixed with 1/2 cup water for glaze | 1 tablespoon |
Equipment Needed
- •Kitchen scale (strongly recommended)
- •Large mixing bowl
- •Wooden spoon
- •Bench scraper
- •Baking sheet
- •Wire cooling rack
- •Sharp serrated knife or bread lame
- •Instant-read thermometer
- •Small saucepan for glaze
Instructions
- 1
Build the overnight sponge
The night before you plan to bake, combine the rye flour, bread flour, warm water, and 1/4 teaspoon yeast in a medium bowl. Stir vigorously with a wooden spoon until no dry flour remains. The mixture will be thick and sticky, somewhere between pancake batter and wet dough. Cover tightly with plastic wrap and leave at room temperature overnight, at least 8 hours and up to 14. By morning, the sponge will have risen and fallen, with bubbles throughout and a pleasantly sour aroma. This is the foundation of your bread's flavor.
If your kitchen runs cold (below 65°F), place the bowl near the stove or in a turned-off oven with the light on. Yeast needs warmth to do its work. - 2
Mix the final dough
Add the bread flour, remaining rye flour, warm water, 1 1/2 teaspoons yeast, salt, caraway seeds, molasses, and oil to the bowl with the sponge. Mix with a wooden spoon until a shaggy mass forms. The dough will look rough and feel sticky. That's correct. Rye flour absorbs water differently than wheat, and you must resist the urge to add more flour.
Weigh your ingredients if you can. A kitchen scale costs twenty dollars and transforms your baking. Volume measurements for flour vary wildly depending on how you scoop. - 3
Knead the dough
Turn the dough onto a lightly floured surface. Knead for 8 to 10 minutes, using a bench scraper to help manage the stickiness. Push the dough away with the heel of your hand, fold it back, rotate a quarter turn, and repeat. The dough will gradually become smoother and more cohesive, though it will never develop the elastic windowpane you see in pure wheat breads. Rye has less gluten. Accept this. When the dough holds together and bounces back slightly when poked, you're done.
Oil your hands lightly if the sticking becomes unmanageable. A little oil is better than adding too much flour, which will make your bread dense and dry. - 4
First rise
Shape the dough into a rough ball and place it in a lightly oiled bowl, turning once to coat. Cover with plastic wrap or a damp kitchen towel. Let rise in a warm spot until nearly doubled, about 1 1/2 to 2 hours. The dough is ready when you press it with a floured finger and the indentation springs back slowly. If it springs back immediately, give it another 20 minutes.
- 5
Shape the loaf
Dust a baking sheet generously with cornmeal. Turn the risen dough onto a lightly floured surface and press gently to deflate. Shape into an oval by folding the sides toward the center, then rolling the dough away from you while tucking the edges under to create surface tension. The loaf should be about 10 inches long with a taut top surface. Place seam-side down on the prepared baking sheet. Cover loosely with oiled plastic wrap.
Surface tension is the secret to a beautiful loaf. If your dough looks slack and flat, pick it up and reshape, pulling the surface taut as you tuck the bottom. - 6
Final proof
Let the shaped loaf rise until puffy and nearly doubled, 45 minutes to 1 hour. Meanwhile, position your oven rack in the center and preheat to 400°F. Prepare the cornstarch glaze by whisking 1 tablespoon cornstarch with 1/2 cup water in a small saucepan. Bring to a simmer over medium heat, stirring constantly, until thickened and translucent. Remove from heat and let cool slightly.
- 7
Score and glaze
Using a sharp serrated knife or razor blade held at a 45-degree angle, slash the top of the loaf with three diagonal cuts about 1/2 inch deep. Work confidently with quick, decisive strokes. Hesitation makes ragged cuts. Brush the entire surface with the cornstarch glaze, then sprinkle with additional caraway seeds if you like them.
- 8
Bake with steam
Place a metal baking pan on the lower oven rack. When you put the bread in the oven, carefully pour 1 cup of hot water into the pan to create steam. This steam keeps the crust soft during the first phase of baking, allowing maximum rise before the crust sets. Bake for 15 minutes with the steam, then carefully remove the water pan. Continue baking for 25 to 30 minutes more, until the crust is deep mahogany brown and the loaf sounds hollow when tapped on the bottom. Internal temperature should reach 200°F to 205°F.
Don't open the oven during the first 15 minutes. You'll release all the steam you worked to create. - 9
Cool completely
Transfer the loaf to a wire rack immediately. This is the hardest part: you must let it cool completely, at least 2 hours, before slicing. Cut into warm bread and you'll compress the crumb, leaving you with a gummy interior and a crust that softens within minutes. Patience. The bread is still cooking as it cools, and the flavors are still developing. Wait.
Chef Tips
- •Medium rye flour (sometimes labeled 'rye flour' with no qualifier) gives the best balance of flavor and structure. Whole rye or dark rye makes a denser, more intensely flavored loaf. Light rye tastes barely different from wheat. If your grocery store only carries one type, it's almost certainly medium.
- •The cornstarch glaze creates that characteristic shiny, crackly crust you see in bakery rye. An egg wash works too, but the texture is different, more matte and chewy rather than brittle.
- •This bread keeps beautifully. Store wrapped in a clean kitchen towel at room temperature for 3 days, or slice and freeze for up to 2 months. Toast frozen slices directly, no thawing needed.
- •For an even more complex flavor, replace half the water in the sponge with plain yogurt or buttermilk. The extra acid mimics a traditional rye sourdough culture.
- •A proper pastrami sandwich requires rye bread, spicy brown mustard, and nothing else interfering with the meat. Maybe a pickle on the side. The bread and meat are partners. Treat them with equal respect.
Advance Preparation
- •The overnight sponge requires 8 to 14 hours of fermentation, so begin the evening before you want to bake.
- •Fully baked and cooled bread can be wrapped tightly and frozen for up to 2 months. Thaw at room temperature still wrapped, then refresh in a 350°F oven for 5 minutes to restore the crust.
- •The sponge can be refrigerated for up to 24 hours if your schedule changes. Bring to room temperature for 1 hour before proceeding with the dough.
Frequently Asked Questions
Nutrition Information
1 serving (about 180g)
Where cooking meets culture.
Culinary mentorship, cultural storytelling, and the editorial depth that makes cooking meaningful.
Explore Culinary Advisor