Culinary Advisor
A cooking platform built around craft, culture, and the stories behind what we eat.
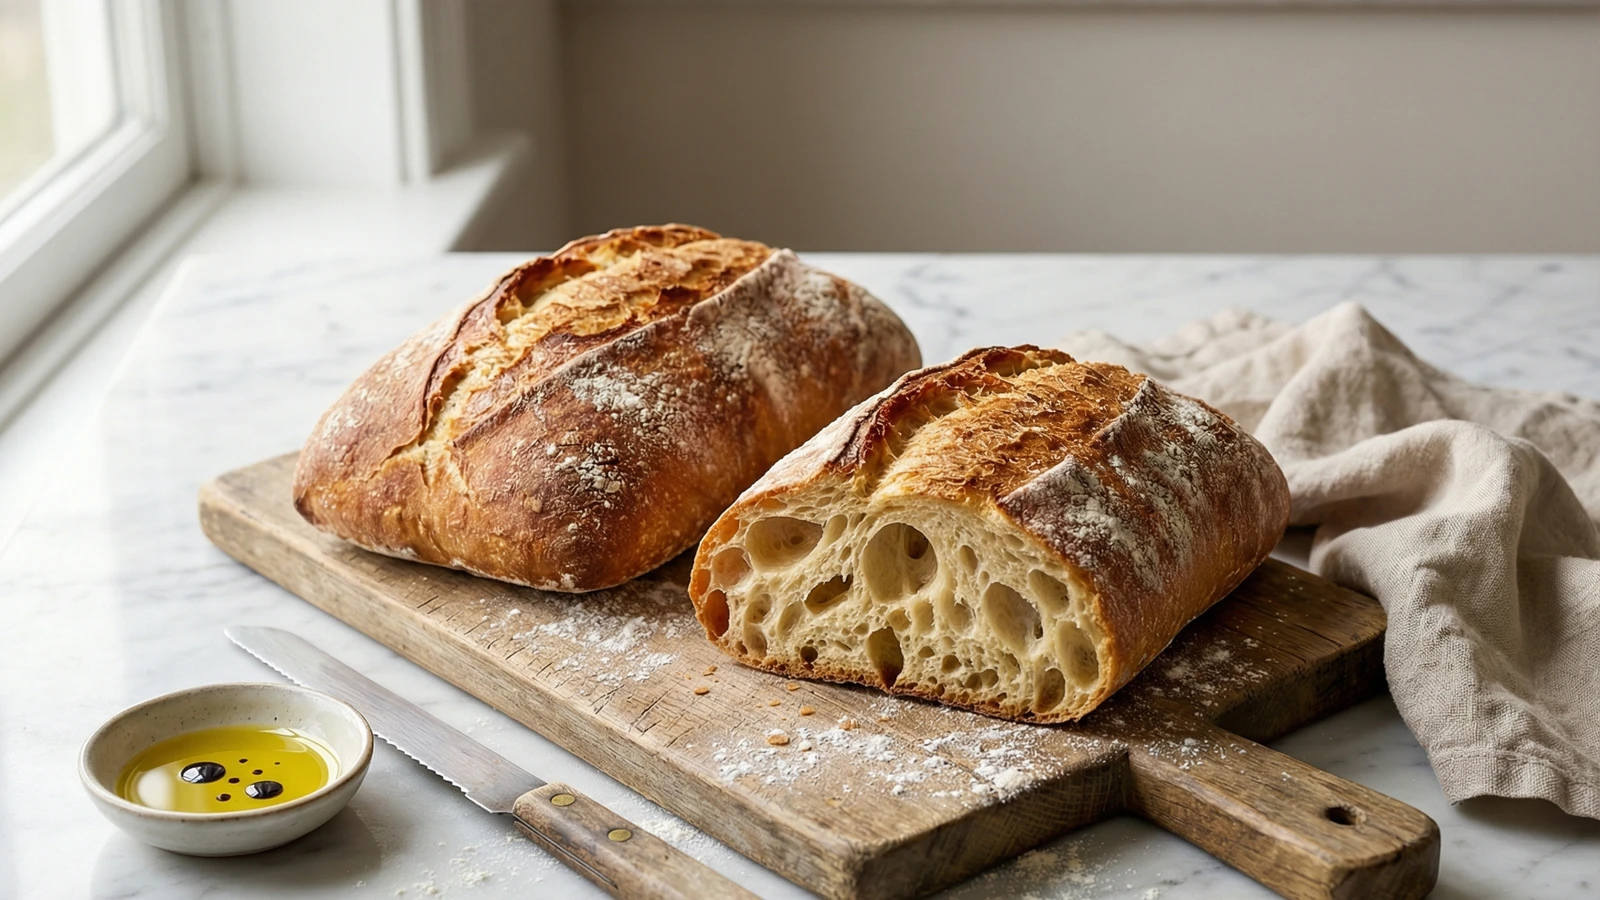
Italian Ciabatta
Created by
The iconic Italian slipper bread with a shattering golden crust and an interior so open and airy you could lose your car keys in there. High-hydration dough rewards patience with results no bakery can match.
Ciabatta is a young bread with an old soul. Created in 1982 by a baker named Arnaldo Cavallari in the Veneto region, it was Italy's answer to the French baguette that had begun dominating sandwich shops across Europe. The name means slipper, and once you've shaped your first loaf, you'll understand why. Flat, rustic, utterly unpretentious.
What makes ciabatta remarkable is what it asks of you: restraint. This dough is wet. Sticky. It will cling to your hands and test your confidence. Every instinct will tell you to add more flour. Resist. That hydration is the whole secret. Water creates steam. Steam creates the dramatic holes. Those holes make the bread.
I've watched students panic at this dough a hundred times. They poke it, stretch it, frown at its slack refusal to behave like normal bread. Then they pull their first loaves from the oven and everything changes. The crust crackles as it cools. The interior reveals caverns you could hide a thumb in. They understand.
This recipe uses a poolish, a pre-ferment that develops flavor and structure overnight. It's an extra step, but bread rewards those who wait. Start the poolish before bed. Mix your dough after your morning coffee. Bake in time for dinner. The rhythm becomes natural, and the bread becomes yours.
The technique, the tradition, and the story behind every dish.
Discover Culinary AdvisorIngredients
bread flour (for poolish)
Quantity
250g (about 2 cups)
water, room temperature (for poolish)
Quantity
250g (1 cup)
instant yeast (for poolish)
Quantity
1/8 teaspoon
bread flour (for dough)
Quantity
250g (about 2 cups)
water, room temperature (for dough)
Quantity
100g (scant 1/2 cup)
fine sea salt
Quantity
10g (2 teaspoons)
instant yeast (for dough)
Quantity
1/2 teaspoon
olive oil
Quantity
for coating bowl and hands
| Ingredient | Quantity |
|---|---|
| bread flour (for poolish) | 250g (about 2 cups) |
| water, room temperature (for poolish) | 250g (1 cup) |
| instant yeast (for poolish) | 1/8 teaspoon |
| bread flour (for dough) | 250g (about 2 cups) |
| water, room temperature (for dough) | 100g (scant 1/2 cup) |
| fine sea salt | 10g (2 teaspoons) |
| instant yeast (for dough) | 1/2 teaspoon |
| olive oil | for coating bowl and hands |
Equipment Needed
- •Kitchen scale
- •Large mixing bowl
- •Bowl scraper or flexible spatula
- •Rimless baking sheet or wooden peel
- •Parchment paper
- •Cast iron skillet for steam
- •Instant-read thermometer
- •Wire cooling rack
Instructions
- 1
Make the poolish
In a medium bowl, combine 250g bread flour, 250g room temperature water, and 1/8 teaspoon instant yeast. Stir with a wooden spoon until no dry flour remains. The mixture will be thick and shaggy, like wet concrete. Cover tightly with plastic wrap and leave at room temperature for 8 to 12 hours, ideally overnight. When ready, the poolish will have tripled in volume, its surface covered in bubbles, and it will smell yeasty and slightly tangy. This is fermentation doing its work.
The poolish is ready when it has risen dramatically and just begun to collapse in the center. If it has fallen flat, it overproofed but will still work. Adjust your timing next batch. - 2
Mix the dough
Add the remaining 250g bread flour, 100g water, and 1/2 teaspoon instant yeast directly to the bowl with the poolish. Mix with a wooden spoon or your hand, squeezing and folding until everything is incorporated. This will take 2 to 3 minutes. The dough will be extremely sticky and wet. That is correct. Do not add flour. Sprinkle the salt over the top, then squeeze and fold it through the dough for another minute until fully incorporated. Cover the bowl and let rest for 20 minutes.
Wet your mixing hand before working the dough. The moisture prevents sticking better than flour, which would tighten the crumb. - 3
Perform stretch and folds
Oil a large bowl generously. Wet your hands and slide them under the dough, lifting it out of the mixing bowl in one piece. Transfer to the oiled bowl. Now perform your first set of folds: grab one edge of the dough, stretch it upward until you feel resistance, then fold it over to the opposite side. Rotate the bowl 90 degrees and repeat. Do this four times, once from each direction. The dough will tighten into a rough ball. Cover and rest 30 minutes. Repeat this folding process three more times, resting 30 minutes between each set. With each round, you'll feel the dough grow stronger, more elastic, more alive under your hands.
- 4
Bulk fermentation
After your final set of folds, cover the bowl and let the dough ferment at room temperature until doubled in size. This takes 1 to 2 hours depending on your kitchen temperature. The dough should be puffy, jiggly when you nudge the bowl, and filled with visible bubbles when you look at it from the side. Press a floured finger into the surface: the indentation should spring back slowly but not completely. That hesitation tells you the fermentation is mature.
In a warm kitchen above 75°F, this goes faster. In a cool kitchen below 68°F, give it more time. Temperature is the gas pedal of fermentation. - 5
Prepare your workspace
Generously flour a large work surface with bread flour. Have a bowl scraper or flexible spatula ready. Flour a rimless baking sheet or large cutting board that will serve as your transfer peel. Line a separate baking sheet with parchment paper. Place a cast iron skillet or metal pan on the bottom rack of your oven. Preheat the oven to 475°F. Let it heat for at least 30 minutes. The thermal mass needs time to saturate.
- 6
Divide and shape
Tip the dough onto your floured surface. It will spread into a rough rectangle. Flour the top lightly. Using your bowl scraper, divide the dough in half crosswise. Now the critical part: handle this dough like a sleeping baby. No punching, no degassing, no aggressive shaping. Those bubbles are your crumb. Gently stretch each piece into a rough rectangle about 4 by 10 inches. The edges should be ragged and imperfect. That's authentic. Transfer each loaf to the floured peel, leaving space between them.
- 7
Final proof
Let the shaped loaves rest uncovered for 30 to 45 minutes. They will spread slightly and puff visibly. The surface will develop a slight skin, which is fine. Resist the urge to reshape or tighten them. When you poke the dough gently, it should feel airy and spring back slowly.
- 8
Bake with steam
Working quickly to preserve oven heat, slide the loaves from the peel onto the parchment-lined baking sheet. Transfer immediately to the oven. Pour 1 cup of hot water into the cast iron skillet on the bottom rack and close the door fast. The burst of steam will hit you. That steam keeps the crust soft during the first minutes of baking, allowing maximum oven spring. Bake for 10 minutes with steam, then carefully remove the skillet. Continue baking for 12 to 15 minutes more until the crust is deep golden brown, almost mahogany in spots. The loaves should feel light when lifted, their internal temperature at least 205°F.
If your crust pales too quickly, your oven runs cool. Add 5 minutes. If it darkens too fast, drop the temperature to 450°F after removing the steam pan. - 9
Cool completely
Transfer the loaves to a wire rack. Listen. You should hear the crust crackling and singing as it cools, tiny fractures forming in the surface. This is called the song of the bread. Do not cut into the loaves for at least 30 minutes, preferably an hour. The interior is still cooking from residual heat. Cutting too soon releases steam and leaves you with a gummy crumb. Patience. You've waited this long.
Chef Tips
- •Weigh your ingredients. Volume measurements in bread are unreliable. A cup of flour can vary by 30 percent depending on how you scoop it. A kitchen scale costs twenty dollars and lasts forever.
- •Bread flour matters here. All-purpose flour has less protein and will produce a tighter crumb. Look for flour with 12 to 14 percent protein content. King Arthur Bread Flour is widely available and consistent.
- •If your dough tears during stretching rather than stretching smoothly, you haven't built enough gluten. Give it another rest, another fold. Time and gentle handling develop strength that force cannot.
- •Store ciabatta cut-side down on a cutting board, loosely covered. It stays fresh for two days. After that, slice and freeze for toast. Day-old ciabatta makes extraordinary croutons and panzanella.
- •For an overnight cold proof that deepens flavor and fits your schedule, refrigerate the shaped loaves immediately after shaping. They'll proof slowly overnight. Pull them out 90 minutes before baking to finish proofing at room temperature.
Advance Preparation
- •The poolish must be made 8 to 12 hours ahead. Start it the night before you want to bake.
- •Shaped loaves can be refrigerated for up to 18 hours for a cold proof, which develops more complex flavor. Allow 90 minutes at room temperature before baking.
- •Baked ciabatta freezes beautifully for up to 2 months. Wrap tightly in plastic, then foil. Thaw at room temperature and refresh in a 375°F oven for 5 minutes.
Frequently Asked Questions
Nutrition Information
1 serving (about 62g)
Where cooking meets culture.
Culinary mentorship, cultural storytelling, and the editorial depth that makes cooking meaningful.
Explore Culinary Advisor