Culinary Advisor
A cooking platform built around craft, culture, and the stories behind what we eat.
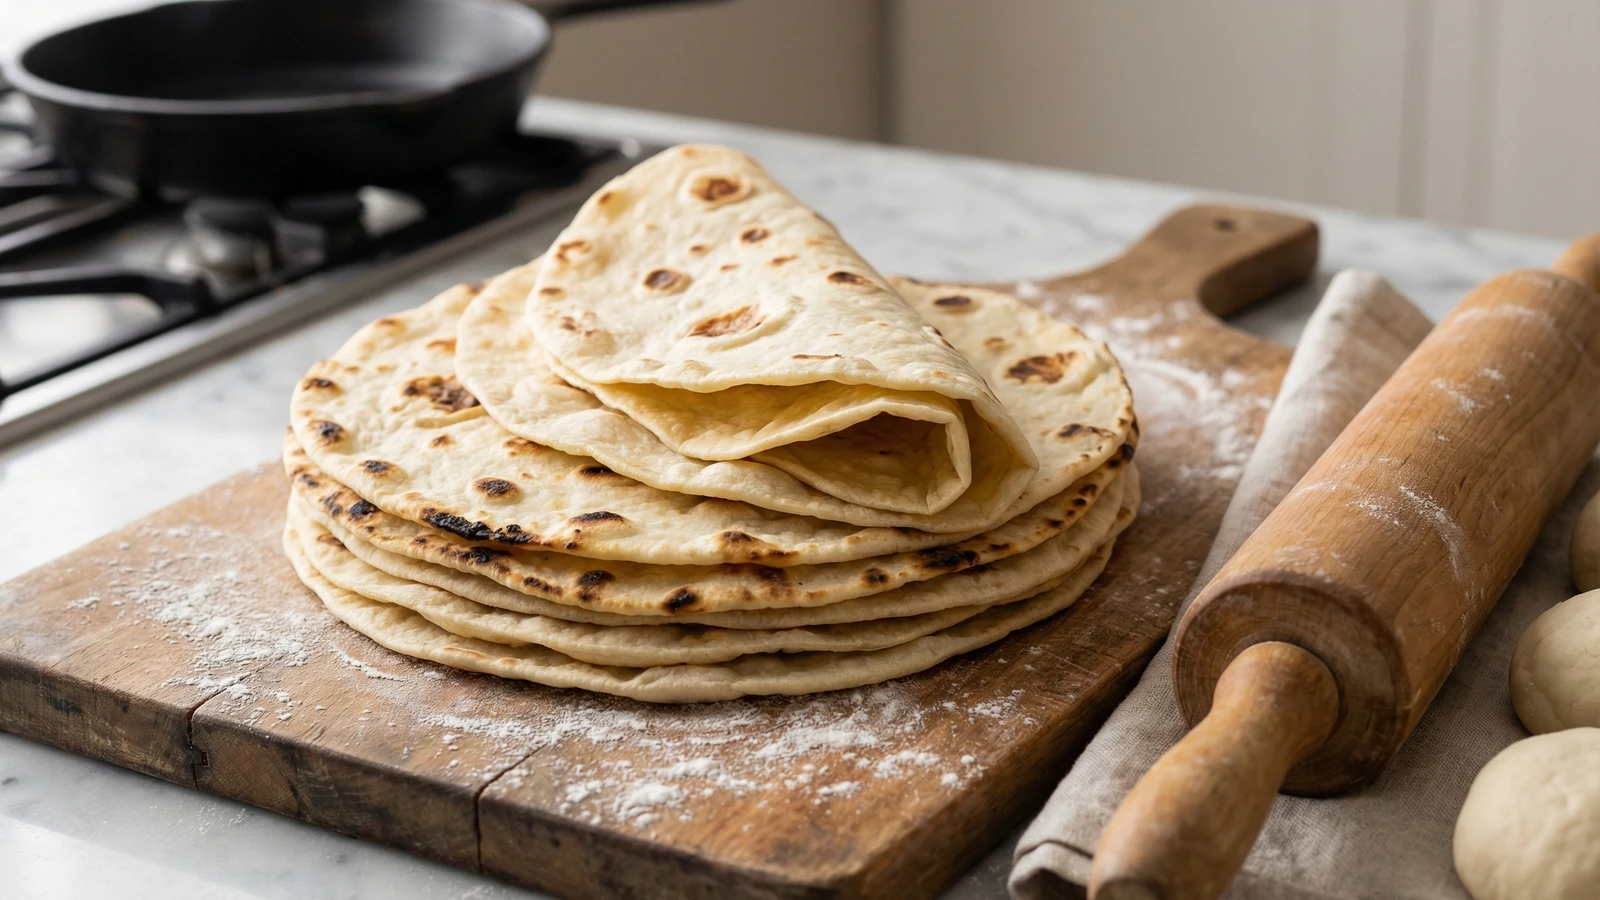
Homemade Flour Tortillas
Created by
Supple, golden-spotted rounds made from five ingredients and a hot skillet. Once you've felt warm tortilla dough yield beneath your rolling pin, those plastic-wrapped packages become unthinkable.
The flour tortilla belongs to northern Mexico, where Spanish colonizers planted wheat and local cooks transformed it into something the Europeans never imagined. These aren't the corn tortillas of the south. They're tender, pliable, and honest in a way that requires neither special equipment nor rare ingredients. Just flour, fat, salt, and water. The rest is technique.
I've watched countless students overthink this process. They worry about exact hydration percentages and gluten development charts. Meanwhile, generations of grandmothers in Sonora and Chihuahua have been making perfect tortillas by feel alone. The dough should be soft as an earlobe. That's your target. If it's too sticky, dust your hands. If it's too stiff, wet them.
The real secret lives in two places: fat and rest. Traditional recipes call for lard, and I won't pretend vegetable shortening tastes the same. But both work. The fat coats the flour proteins, creating tenderness. The resting period relaxes the gluten you've developed through kneading, making the dough cooperative rather than springy. Skip this step and you'll fight every tortilla to the death.
These take about an hour from bowl to plate, including the mandatory rest. Make them once. Feel how the dough transforms under your hands. Watch them puff on a dry skillet like small edible miracles. You won't need convincing after that.
The technique, the tradition, and the story behind every dish.
Discover Culinary AdvisorIngredients
all-purpose flour
Quantity
300g (2 1/2 cups)
plus more for dusting
fine sea salt
Quantity
1 teaspoon
lard or vegetable shortening
Quantity
75g (1/3 cup)
at room temperature
warm water
Quantity
180ml (3/4 cup)
about 110°F
| Ingredient | Quantity |
|---|---|
| all-purpose flourplus more for dusting | 300g (2 1/2 cups) |
| fine sea salt | 1 teaspoon |
| lard or vegetable shorteningat room temperature | 75g (1/3 cup) |
| warm waterabout 110°F | 180ml (3/4 cup) |
Equipment Needed
- •Large mixing bowl
- •Rolling pin (a straight dowel-style works best)
- •12-inch cast iron skillet or comal
- •Clean kitchen towels
- •Kitchen scale (optional but recommended)
Instructions
- 1
Combine dry ingredients
Whisk the flour and salt together in a large bowl. This ensures even distribution before the fat goes in. Uneven salt means some tortillas taste flat while others assault your palate.
- 2
Work in the fat
Add the lard or shortening in small pieces. Using your fingertips, rub the fat into the flour until the mixture resembles coarse meal with some pea-sized lumps remaining. Work quickly. You're coating flour particles with fat, not melting it with your body heat. The texture should remind you of pie dough before the liquid goes in.
Cold hands help. Run them under cold water and dry thoroughly if your kitchen runs warm. - 3
Add warm water
Pour the warm water into the flour mixture. Stir with a fork until a shaggy mass forms. The dough will look rough and uneven. This is correct. Don't expect smoothness yet.
- 4
Knead until smooth
Turn the dough onto a clean surface (no flour yet) and knead for 2 to 3 minutes. Use the heel of your hand to push the dough away, then fold it back on itself. The dough will transform from shaggy to smooth, becoming soft and slightly tacky but not sticky. It should feel like a firm pillow. If it clings to your hands, dust them lightly with flour. If it feels stiff and resistant, wet your palms with water and continue.
The 'earlobe test' is real. Pinch your earlobe, then pinch the dough. They should feel similar in softness and give. - 5
Divide and rest
Divide the dough into 12 equal pieces, about 45 grams each. Roll each piece into a smooth ball by cupping it in your palm and rotating against the work surface. Place the balls on a plate or sheet pan and cover with a damp kitchen towel or plastic wrap. Rest for at least 30 minutes at room temperature. This step is not optional. The gluten needs time to relax or your tortillas will shrink back every time you roll them.
Dough balls can rest up to 2 hours at room temperature or overnight in the refrigerator. Bring refrigerated dough to room temperature before rolling. - 6
Heat your cooking surface
Place a cast iron skillet or comal over medium-high heat. Let it get properly hot, about 3 to 4 minutes. Test by flicking a few drops of water onto the surface. They should sizzle and evaporate within 2 seconds. No oil. No butter. A dry pan creates the characteristic spots and slight char.
- 7
Roll the tortillas
Working with one ball at a time, flatten it slightly with your palm on a lightly floured surface. Using a rolling pin, roll from the center outward, rotating the dough a quarter turn after each pass. Apply even pressure. You're aiming for rounds about 8 inches across and roughly 1/16 inch thick. They don't need to be perfect circles. Irregular edges are honest. If the dough springs back stubbornly, cover it and let it rest another 5 minutes before trying again.
Roll only 2 or 3 tortillas ahead. They dry out quickly once flattened, making them harder to cook properly. - 8
Cook the first side
Lay the rolled tortilla onto the dry, hot skillet. Within 20 to 30 seconds, you'll see bubbles forming underneath and the surface will lose its raw, shiny look. The bottom should develop golden-brown spots. If it's blackening immediately, your heat is too high. If nothing happens after 45 seconds, increase the heat.
- 9
Flip and finish
Flip the tortilla using a spatula or your fingers if you're feeling brave. Cook the second side for another 20 to 30 seconds. The tortilla may puff dramatically, ballooning with steam. This is the moment that makes the work worthwhile. Press gently with the spatula if it puffs unevenly. The second side should have fewer spots than the first. Total cooking time is under a minute per tortilla.
If your tortillas aren't puffing at all, your dough may be too thick or your pan not hot enough. Adjust and continue. - 10
Keep warm and serve
Transfer each finished tortilla to a clean kitchen towel and fold the towel over to cover. The steam trapped inside keeps them soft and pliable. Stack them as you go. They'll stay warm for 15 to 20 minutes this way. Serve immediately with whatever fills your heart: carne asada, scrambled eggs, beans, or just butter and salt.
Chef Tips
- •Lard makes the most tender, flavorful tortillas. Find it at Mexican groceries or butcher shops, or render your own from pork fat. Vegetable shortening produces excellent results with a neutral flavor. Olive oil works in a pinch but creates a slightly different texture.
- •Weigh your flour if you have a scale. Cup measurements vary wildly based on how you scoop. Too much flour makes stiff, crackly tortillas. Too little makes them sticky and difficult to roll.
- •A tortilla warmer or insulated container keeps them soft longer than a towel. If you make tortillas regularly, it's worth the small investment.
- •These freeze beautifully. Stack cooled tortillas with parchment paper between them, seal in a freezer bag, and freeze for up to 2 months. Reheat directly on a hot, dry skillet for 15 seconds per side.
Advance Preparation
- •Dough balls can be made up to 24 hours ahead and refrigerated, covered tightly. Bring to room temperature for 30 minutes before rolling.
- •Cooked tortillas keep at room temperature, wrapped in a towel and then plastic, for up to 8 hours. Reheat briefly on a dry skillet to restore pliability.
- •For longer storage, refrigerate for up to 5 days or freeze for up to 2 months. Always reheat before serving.
Frequently Asked Questions
Nutrition Information
1 tortilla (about 48g)
Where cooking meets culture.
Culinary mentorship, cultural storytelling, and the editorial depth that makes cooking meaningful.
Explore Culinary Advisor