Culinary Advisor
A cooking platform built around craft, culture, and the stories behind what we eat.
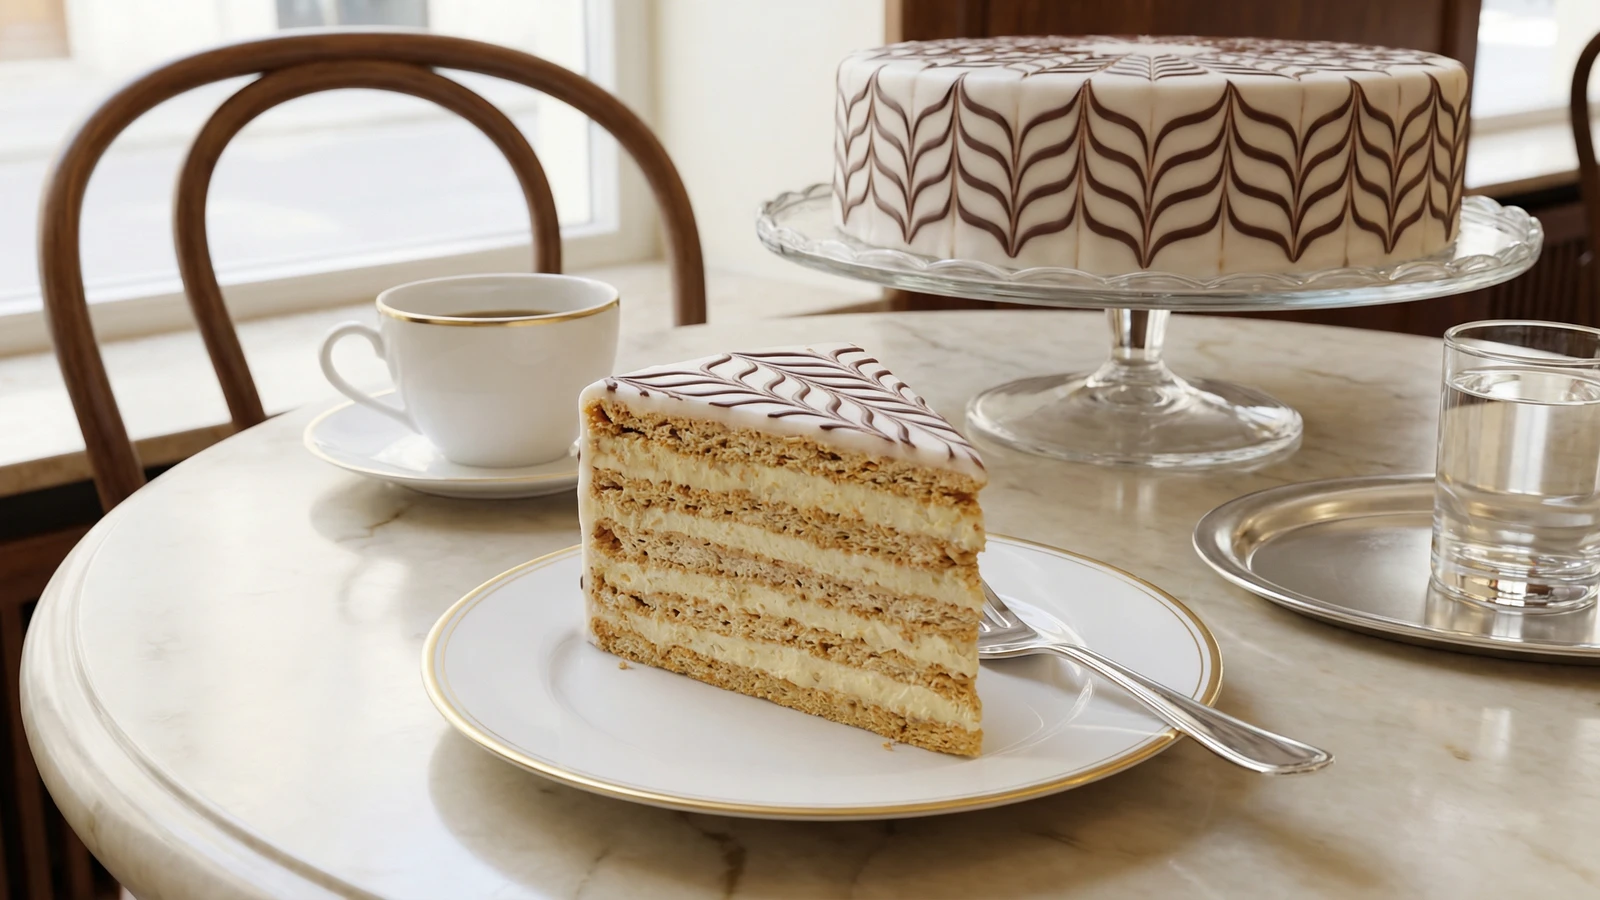
Esterházytorte
Created by Chef Elsa
Five layers of toasted almond meringue layered with vanilla-cognac buttercream, the whole thing crowned with white fondant feathered into chocolate chevrons. The Konditorei showpiece that happens to be gluten-free.
Gretel always said that Torten are how the Viennese prove they're serious about dessert. Not cakes, not pastries. Torten. And the Esterházytorte was one she talked about with particular respect, because it asks the baker to be precise without being fussy, to build something beautiful from layers of ground almonds and buttercream and then finish it with a technique that looks impossible until someone shows you how simple it really is.
I learned the feathering at GAFA in Vienna. You pour warm white fondant over the top, pipe thin concentric circles of dark chocolate while it's still wet, then drag a toothpick through in alternating directions. The chocolate pulls into these perfect pointed chevrons. The whole thing takes forty-five seconds and looks like you spent an hour on it. Every Konditorei in Vienna has this Torte in the display case, the feathered top gleaming behind glass, and every time I see one I think about the first time I got the pattern right and stood there grinning at a practice disc of fondant like I'd won something.
What makes Esterházytorte special is the meringue. Five thin layers of ground almonds whipped with egg whites, baked until just golden and slightly chewy. No flour. Not because it's trying to be gluten-free for modern dietary reasons, but because the original recipe never needed flour. The almonds provide the structure. Between those layers goes a vanilla buttercream made from real pastry cream beaten with good butter and a splash of cognac. When the assembled Torte rests in the fridge for a few hours, the meringue softens where it touches the cream, and you get this texture that's tender and yielding but still holds its shape when you cut through it. The sides are pressed with toasted almond flakes. The top gleams white and brown.
This is a Konditorei Torte. It takes time and it rewards your attention. But nothing in it is difficult if you understand why each step matters. I'd like to explain.
The Esterházytorte is named after Prince Paul III Anton Esterházy de Galantha (1786-1866), an Austro-Hungarian statesman who served as Foreign Minister of the Habsburg Empire. The Esterházy family, originally Hungarian aristocracy, were among the wealthiest and most influential noble houses in Central Europe, and their name appears on dishes across both Hungarian and Austrian culinary traditions. The torte itself was likely created in a Budapest Konditorei in the mid-19th century and migrated to Vienna, where it became a permanent fixture of the Kaffeehaus display case. The distinctive feathered fondant top, a technique the Viennese call Fächermuster, became the Torte's visual signature and a test of a young Konditor's skill.
The technique, the tradition, and the story behind every dish.
Discover Culinary AdvisorIngredients
egg whites
Quantity
5 large
caster sugar (for meringue)
Quantity
150g
Vanillezucker (vanilla sugar)
Quantity
1 packet (8g)
ground blanched almonds
Quantity
200g
whole milk
Quantity
250ml
vanilla pod
Quantity
1
split and scraped
egg yolks (for buttercream)
Quantity
4 large
caster sugar (for buttercream)
Quantity
80g
cornflour (cornstarch)
Quantity
25g
unsalted butter
Quantity
250g
at room temperature
cognac
Quantity
2 tablespoons
white fondant icing
Quantity
200g
warm water
Quantity
1-2 tablespoons
dark chocolate (70% cocoa)
Quantity
50g
melted
sliced almonds
Quantity
100g
toasted
| Ingredient | Quantity |
|---|---|
| egg whites | 5 large |
| caster sugar (for meringue) | 150g |
| Vanillezucker (vanilla sugar) | 1 packet (8g) |
| ground blanched almonds | 200g |
| whole milk | 250ml |
| vanilla podsplit and scraped | 1 |
| egg yolks (for buttercream) | 4 large |
| caster sugar (for buttercream) | 80g |
| cornflour (cornstarch) | 25g |
| unsalted butterat room temperature | 250g |
| cognac | 2 tablespoons |
| white fondant icing | 200g |
| warm water | 1-2 tablespoons |
| dark chocolate (70% cocoa)melted | 50g |
| sliced almondstoasted | 100g |
Equipment Needed
- •Stand mixer with whisk attachment
- •3 baking sheets lined with parchment
- •Piping bag with 1cm plain nozzle
- •Offset spatula
- •Small saucepan for fondant
- •Toothpick or fine-tipped knife for feathering
- •22cm cake ring or plate for tracing circles
Instructions
- 1
Prepare the baking sheets
Preheat your oven to 180°C (350°F). Line three baking sheets with parchment paper. Using a dark pencil or pen, trace five circles of 22cm diameter on the parchment, then flip the paper over so the ink side faces down. You should still see your guidelines through the paper. You'll bake these in batches if you only have two or three sheets. The circles keep your layers even, which matters when you're stacking five of them. A lopsided Torte is a sad Torte.
- 2
Make the almond meringue
Whip the five egg whites in a spotlessly clean bowl until they hold soft peaks. Add the caster sugar a tablespoon at a time, beating continuously until the meringue is glossy, stiff, and holds its shape when you lift the whisk. Fold in the Vanillezucker. Now fold in the ground almonds by hand, using a large metal spoon or spatula. Work gently. You want to keep the air you just beat into those whites. The batter will deflate slightly as you fold in the nuts. That's normal. Stop the moment the almonds are incorporated.
Grind your own almonds if you can. Store-bought ground almonds are often too fine, almost powdery. You want a slightly coarse texture, like damp sand. Pulse blanched almonds in a food processor with a tablespoon of the sugar to keep them from turning to paste. - 3
Pipe and bake the layers
Divide the meringue mixture evenly among the five traced circles. You can pipe it in a spiral starting from the center using a plain 1cm nozzle, or spread it with an offset spatula. Either way, keep the layers even and fill the circles completely. Bake each batch for 12 to 15 minutes until the surface is dry and lightly golden. The layers should feel firm on top but still have a little give underneath. Don't let them darken too much or they'll taste bitter and crack when you try to stack them. Remove from the oven and let them cool completely on the parchment before peeling them off.
Piping gives you the most even layers. If you spread instead, use a small offset spatula and work from the center outward. Spin the baking sheet as you go. The goal is uniform thickness so the buttercream doesn't ooze out one side when you press the layers together. - 4
Make the pastry cream base
Pour the milk into a saucepan with the scraped vanilla seeds and the empty pod. Bring it to a gentle simmer, then remove from heat and let it steep for ten minutes. In a separate bowl, whisk the egg yolks with 80g of caster sugar until pale and thick. Whisk in the cornflour until smooth. Pour the warm vanilla milk through a sieve into the egg mixture, whisking constantly. Return everything to the saucepan and cook over medium heat, stirring without stopping, until it thickens into a proper pastry cream. This takes three to four minutes. You'll feel the whisk drag through it. Pour it into a clean bowl, press cling film directly onto the surface to prevent a skin, and let it cool completely to room temperature.
The pastry cream must be fully cool before you beat the butter into it. If it's even slightly warm, the butter will melt instead of emulsifying and you'll have a greasy, broken mess instead of silk. Patience here saves the whole Torte. - 5
Finish the buttercream
Beat the softened butter in a stand mixer until it's pale, fluffy, and almost white. This takes a good five minutes. Don't rush it. Now add the cooled pastry cream a spoonful at a time, beating well after each addition. The mixture will look alarming halfway through, like it's curdling. Keep beating. It comes together. Once all the pastry cream is incorporated, add the cognac and beat for another minute. The finished buttercream should be smooth, glossy, and hold its shape. It will taste of vanilla and butter with a warm cognac finish.
- 6
Assemble the layers
Choose the most even meringue layer and set it aside for the top. This one gets the fondant, so it needs to be flat. Place the first layer on a cake board or flat serving plate. Spread a thin, even coat of buttercream over it, about 3mm thick. Press the next layer gently on top. Repeat: buttercream, layer, buttercream, layer, buttercream, layer. Four layers of meringue, three layers of buttercream between them. Don't press down hard or the meringue will crack. Now spread a thin coat of buttercream over the sides of the Torte, just enough to give the almonds something to cling to. Save a few tablespoons of buttercream for touch-ups. Reserve the top layer and the remaining buttercream.
- 7
Press the almonds
Cup the toasted sliced almonds in your hand and press them gently against the buttercream-coated sides of the Torte. Work your way around, pressing and patting until the sides are completely covered with a golden layer of toasted almonds. Do this over a tray to catch what falls. You can pick up the fallen almonds and press them on again. This is how every proper Konditorei finishes their Torten, and it's not just decoration. The toasted almonds add texture and flavour and they make the whole thing look like it came out of a glass case on the Graben.
- 8
Glaze the top layer
Place the reserved top meringue layer on a sheet of parchment, flat side up. Warm the white fondant icing with a tablespoon or two of warm water in a small saucepan over the lowest possible heat, stirring until it's smooth and pourable, like thick cream. Pour it over the meringue layer and spread it quickly with an offset spatula to cover the surface evenly. You have about thirty seconds before it starts to set, so don't hesitate. Work from the center outward in smooth, confident strokes.
- 9
Feather the chocolate pattern
Work quickly now. While the fondant is still wet and glossy, pipe thin concentric circles of melted dark chocolate across the surface, spacing them about 1.5cm apart. Start from the center and spiral outward. The chocolate should sit on top of the fondant, not sink into it. Immediately take a toothpick or the tip of a small knife and draw straight lines from the center of the Torte to the edge, spacing them evenly around the circle. Then draw lines from the edge back to the center between the first set, pulling in the opposite direction. This creates the classic feathered chevron pattern. The whole thing takes less than a minute. If the fondant has already set, the pattern won't pull cleanly. Speed and confidence. That's the secret.
Fill a small piping bag or a sandwich bag with the corner snipped off. You need a thin, steady line of chocolate. If the line is too thick, the feathering looks clumsy. Practice on a plate first if you've never done this. It's easier than it looks once you see how the chocolate drags through the fondant. - 10
Set the top and chill
Let the fondant set for five minutes until it's firm to the touch. Carefully place the glazed top layer onto the assembled Torte. Spread a thin layer of buttercream on top of the fourth meringue layer first to glue the top in place. Press down gently. Use a sharp knife to trim any fondant that overhangs the edges. Refrigerate the Torte for at least two hours before serving. This lets the buttercream firm up and the meringue layers soften just slightly where they meet the cream, creating that distinctive texture: not crunchy, not soft, but somewhere tender in between.
- 11
Slice and serve
Remove the Torte from the fridge thirty minutes before serving. The buttercream needs to lose its chill so the flavour comes through. Cut with a sharp knife dipped in hot water and wiped dry between each slice. The layers should be visible in cross-section: golden meringue, pale buttercream, golden meringue, repeating all the way up to the white fondant crown with its chocolate chevrons. Serve on small plates with a cake fork. Coffee alongside. A glass of water. Mahlzeit!
Chef Tips
- •The meringue layers will feel fragile when they come out of the oven. That's fine. Once they're layered with buttercream and chilled, the whole structure firms up. Handle them carefully when they're warm and trust that the finished Torte will slice cleanly.
- •Use a good cognac. Not your best bottle, but something you'd actually drink. The buttercream only has two tablespoons but you taste every drop. Cheap brandy leaves a harsh, hot finish. Good cognac gives you warmth and roundness.
- •The Torte tastes best on the second day. The meringue layers continue to soften overnight in the fridge, and the flavours meld. If you're making this for a dinner party, assemble it the day before and forget about it until thirty minutes before dessert.
- •Toast the sliced almonds in a dry pan over medium heat, shaking often. They go from golden to burnt in about fifteen seconds. The moment you smell them, they're done. Pull them off the heat immediately and tip them onto a cold plate.
Advance Preparation
- •The meringue layers can be baked a day ahead and stored in an airtight container at room temperature. They dry out quickly, so seal them well.
- •The pastry cream base for the buttercream can be made a day ahead and refrigerated. Bring it to room temperature before beating in the butter.
- •The fully assembled Torte keeps beautifully for three days in the fridge. In fact, it improves overnight as the meringue layers absorb moisture from the buttercream.
Frequently Asked Questions
Nutrition Information
1 serving (about 110g)
Where cooking meets culture.
Culinary mentorship, cultural storytelling, and the editorial depth that makes cooking meaningful.
Explore Culinary Advisor