Culinary Advisor
A cooking platform built around craft, culture, and the stories behind what we eat.
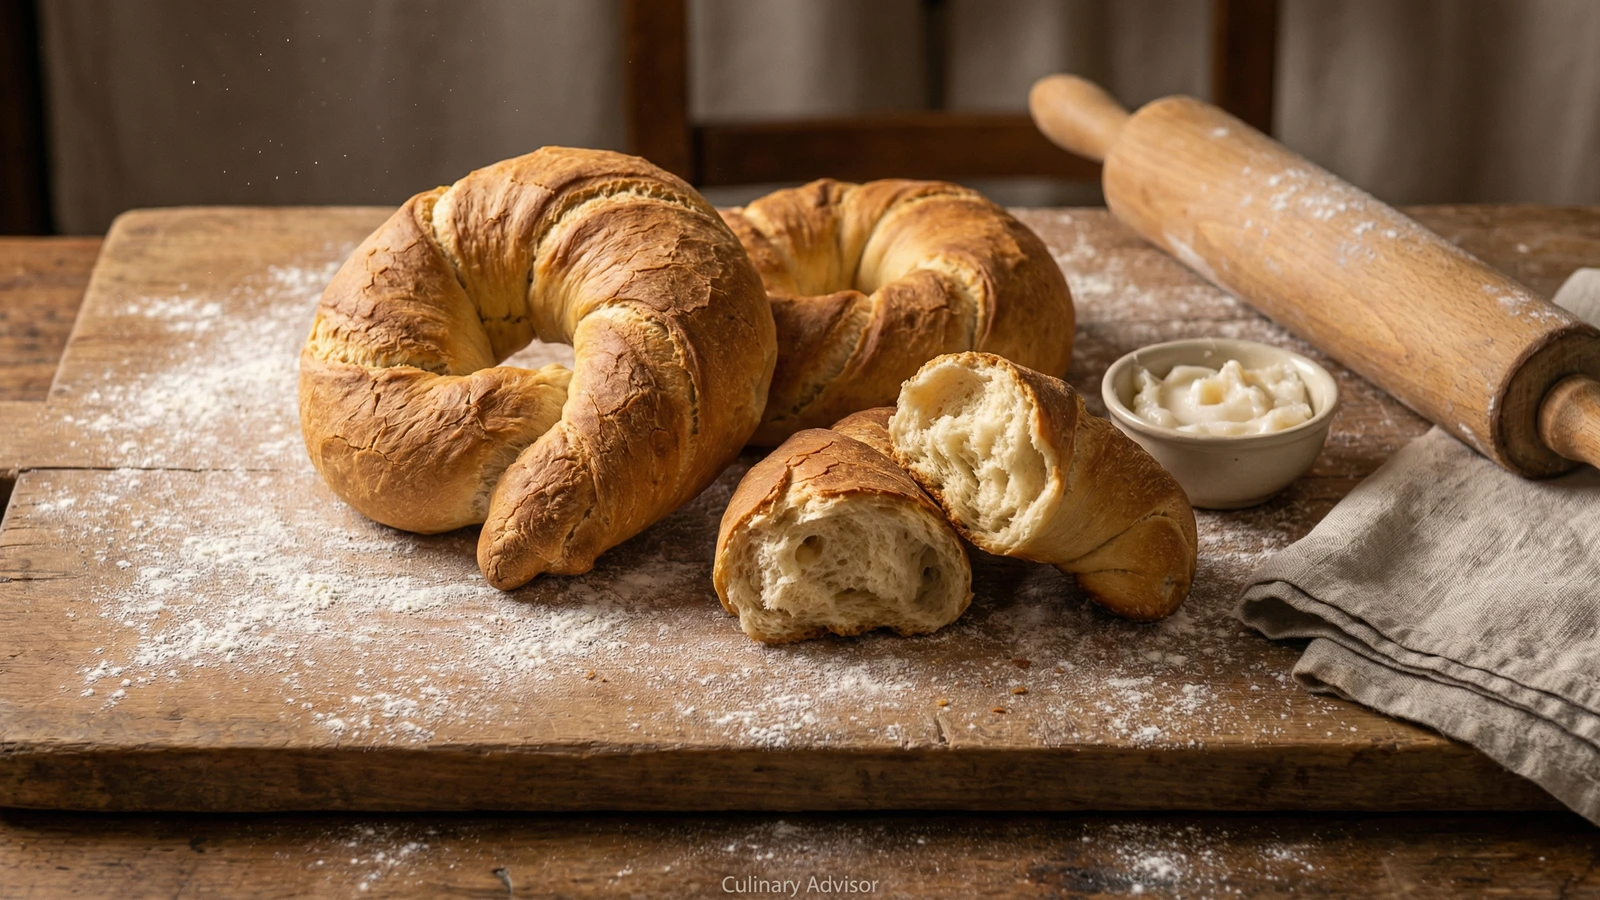
Coppia Ferrarese
Created by Chef Graziella
The ancient twisted bread of Ferrara, where four delicate horns create maximum crust and the dough demands the patience of generations of Emilian bakers who understood that shape is not decoration but function.
This bread proves that form follows function. The coppia's distinctive crossed shape, with its four twisted horns extending from a central body, creates the maximum possible ratio of crust to crumb. Ferraresi have understood this for seven centuries. The shape is not whimsy. It is engineering.
The dough contains lard. This is not negotiable. Modern recipes substitute olive oil entirely, and the result is a different bread. Lard creates the characteristic snap of the crust, the way it shatters between your teeth. It also extends freshness, though coppia is best eaten the day it is made, torn and served alongside the cured meats of Emilia: coppa, culatello, prosciutto di Parma.
The technique requires practice. You must learn to roll the dough into long ropes, twist them with precision, and join them at the center without crushing the structure. The first attempts will be clumsy. This is expected. The bakers of Ferrara train for years. You have the advantage of their seven hundred years of refinement to guide you.
What you keep out matters: no milk, no eggs, no sugar beyond what the malt provides. The bread is lean and honest. It exists to accompany, not to compete.
Court records from Ferrara document coppia-shaped bread as early as 1287, when it appeared at banquets of the Este family. The twisted form likely evolved from ritual breads made for weddings and festivals, the intertwined shapes symbolizing union. In 2004, Coppia Ferrarese received PGI protection from the European Union, and it remains one of the few breads with such distinction.
The technique, the tradition, and the story behind every dish.
Discover Culinary AdvisorIngredients
tipo 0 flour
Quantity
500g
water
Quantity
200g
at room temperature
extra virgin olive oil
Quantity
50g
lard
Quantity
30g
softened
fine sea salt
Quantity
10g
instant yeast
Quantity
7g
malt extract
Quantity
15g
| Ingredient | Quantity |
|---|---|
| tipo 0 flour | 500g |
| waterat room temperature | 200g |
| extra virgin olive oil | 50g |
| lardsoftened | 30g |
| fine sea salt | 10g |
| instant yeast | 7g |
| malt extract | 15g |
Equipment Needed
- •Kitchen scale (essential for proper hydration)
- •Baking stone or heavy inverted sheet pan
- •Steam pan or cast iron skillet for water
- •Wire cooling rack
Instructions
- 1
Mix the dough
Dissolve the malt extract in the room-temperature water and stir until fully incorporated. In a large bowl, combine the flour with the yeast. Add the olive oil and softened lard. Pour in the malt water and mix with your hands or a wooden spoon until a shaggy mass forms. Add the salt and continue mixing. The dough will be stiff and resistant. This is correct.
The low hydration is intentional. Coppia requires a firm dough to hold its twisted shape during proofing and baking. Do not add more water. - 2
Knead thoroughly
Turn the dough onto a clean work surface. Knead with the heel of your hand, pushing forward and folding back, for a full 15 minutes. The dough will transform from rough and resistant to smooth and pliable. It should feel dense but not sticky, with a surface like fine suede. Form it into a ball.
- 3
First rise
Place the dough in a lightly oiled bowl, cover with plastic wrap, and let rise at room temperature until doubled in size. This takes approximately 90 minutes, though temperature affects timing. The dough is ready when a finger pressed into it leaves an impression that springs back slowly.
- 4
Divide and rest
Turn the risen dough onto an unfloured surface. Divide it into 6 equal pieces of approximately 135 grams each. A scale is not optional. Roll each piece into a ball, cover with a towel, and let rest for 15 minutes. This relaxes the gluten and makes shaping possible.
- 5
Shape the ropes
Working with one ball at a time, roll it under your palms into a rope approximately 35 centimeters long. Apply even pressure, working from the center outward. The rope should be uniform in thickness, slightly tapered at the ends. Repeat with the remaining dough balls.
- 6
Form the coppia
Take two ropes and lay them in an X shape, crossing at their centers. The angle should be approximately 60 degrees, not a right angle. Working from the center outward, twist each pair of ends around each other three times, creating four spiraling horns that extend from the central crossing. The twists must be firm but not so tight that they tear the dough. Press the center gently to seal the join.
The shape resembles two crossed cornetti or croissants. Each horn should spiral elegantly. If your first attempts look clumsy, continue. The movement becomes natural with practice. - 7
Final proof
Place the shaped coppie on parchment-lined baking sheets, leaving space between them. Cover loosely with plastic wrap or a towel. Let proof for 45 minutes to 1 hour. The dough should puff slightly but retain its defined shape. The horns should not merge or droop.
- 8
Prepare for baking
Thirty minutes before baking, place a baking stone or inverted sheet pan in the oven and preheat to 220°C (425°F). If you have a steam pan, place it on the lower rack. Coppia requires initial steam to develop its characteristic crust.
- 9
Bake with steam
Slide the coppie, still on their parchment, onto the hot stone. If using a steam pan, pour half a cup of water into it and close the oven door immediately. Bake for 10 minutes with steam. Then remove the steam pan (or prop the oven door open briefly to release moisture) and continue baking for 12 to 15 minutes more, until the crust is deep golden brown and the bread sounds hollow when tapped on the bottom.
The malt in the dough encourages browning. Watch carefully in the final minutes. The crust should be deeply colored but not burnt. - 10
Cool completely
Transfer the baked coppie to a wire rack. Do not tear into them immediately, however strong the temptation. The interior crumb continues cooking from residual heat and needs 20 minutes to set properly. When cooled, the crust should crackle and shatter when broken.
Chef Tips
- •Lard is traditional and irreplaceable. It creates a crust that olive oil alone cannot achieve. Seek out good-quality leaf lard from a butcher if possible. The flavor is clean and subtle.
- •Tipo 0 flour has more structure than tipo 00 and is preferred for this bread. If unavailable, use bread flour with approximately 12% protein. All-purpose flour will not create the proper crumb.
- •The malt extract is essential for the golden-brown crust and subtle sweetness. Barley malt syrup, found in health food stores, works perfectly. Do not substitute honey or sugar.
- •Coppia is best eaten the day it is baked. By the second day, the crust loses its snap. Toast stale coppie to revive the texture, or use them for bread crumbs.
- •Practice the shaping technique with scraps of dough before committing your full batch. The twist must be confident and quick. Hesitation creates uneven horns.
Advance Preparation
- •The dough can be made through the first rise, then refrigerated overnight. Bring to room temperature (about 1 hour) before shaping.
- •Shaped coppie can be frozen before the final proof. Freeze on sheet pans until solid, then transfer to bags. Thaw and proof at room temperature before baking.
- •Once baked, coppia does not improve with time. Serve within hours of baking for the true experience.
Frequently Asked Questions
Nutrition Information
1 serving (about 115g)
Where cooking meets culture.
Culinary mentorship, cultural storytelling, and the editorial depth that makes cooking meaningful.
Explore Culinary Advisor