Culinary Advisor
A cooking platform built around craft, culture, and the stories behind what we eat.
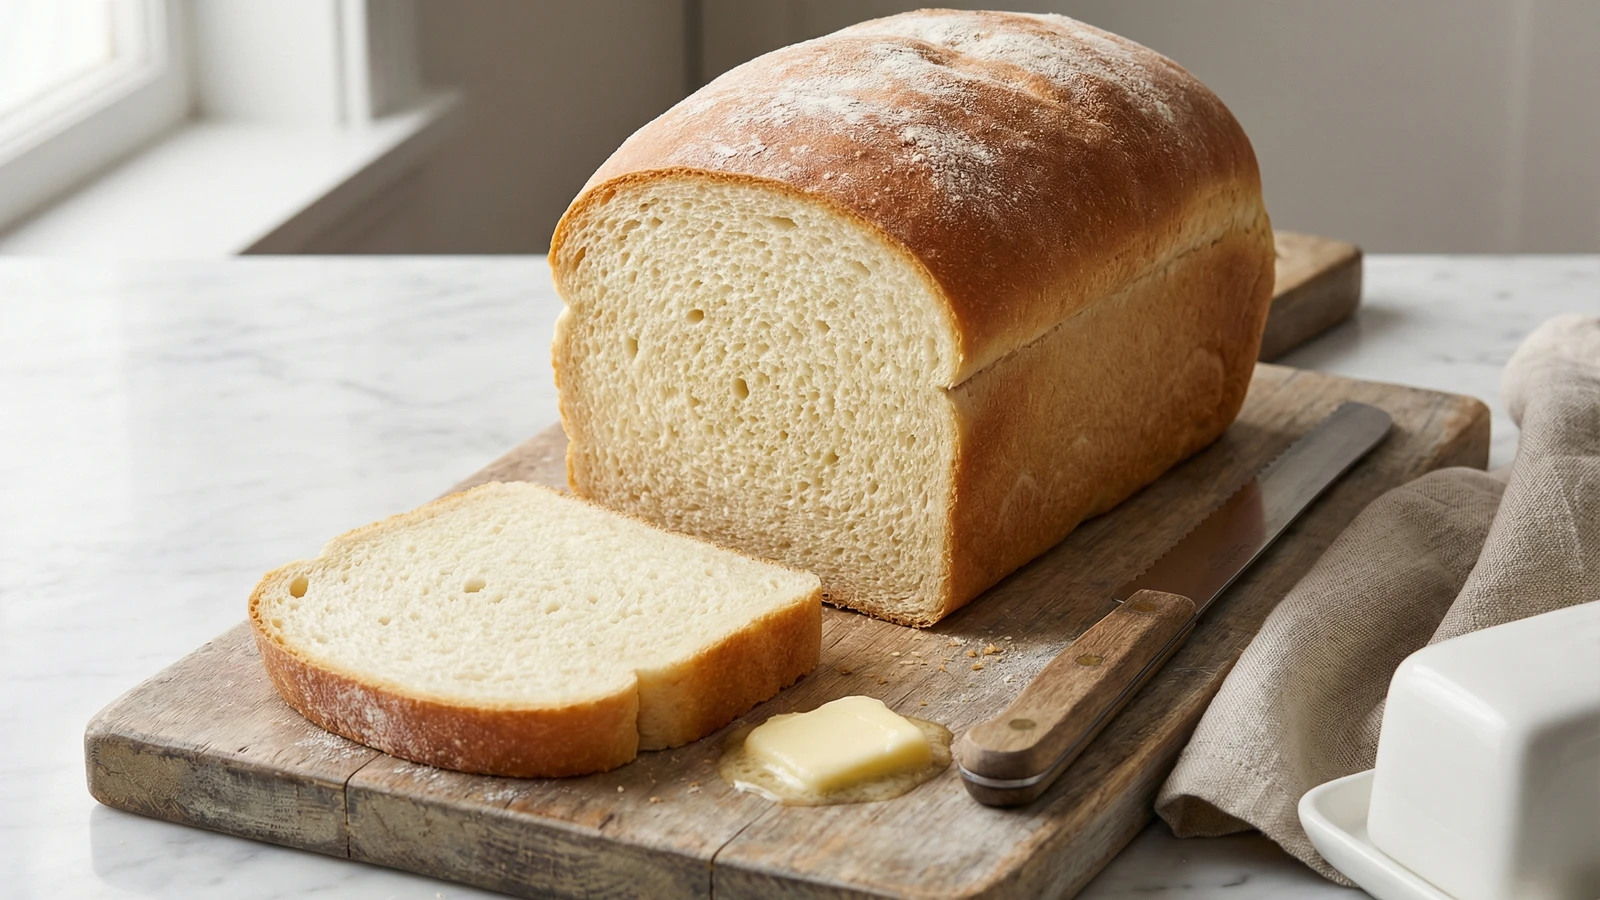
Classic White Sandwich Bread
Created by
A tender, golden-crusted loaf with the fine, even crumb that makes perfect sandwiches and superior toast. This is the bread your grandmother baked, and the first recipe every home baker should commit to memory.
Before sliced bread became a cliché, there was simply bread. American home bakers made loaves like this one every week without fanfare or fuss. The dough came together in a bowl, rose in a warm corner of the kitchen, and emerged from the oven with a crust that crackled when you pressed it. That bread fed families. It made school lunches worth eating and Sunday suppers complete.
This recipe requires no special equipment. A bowl, your hands, and a standard loaf pan will produce bread superior to anything wrapped in plastic at the supermarket. The technique is forgiving. Bread dough wants to succeed. Your job is simply to give it time and warmth, then stay out of its way.
I've taught this loaf to nervous bakers who'd never touched yeast and watched their faces when they pulled that first golden loaf from the oven. There's a particular satisfaction in bread you've made yourself. It connects you to every generation of cooks who came before, kneading dough in kitchens across this country. Master this recipe and you'll never buy sandwich bread again.
The technique, the tradition, and the story behind every dish.
Discover Culinary AdvisorIngredients
bread flour
Quantity
430g (3 1/2 cups)
plus more for kneading
whole milk
Quantity
240ml (1 cup)
warmed to 110°F
warm water
Quantity
60ml (1/4 cup)
110°F
active dry yeast
Quantity
2 1/4 teaspoons (one packet)
granulated sugar
Quantity
2 tablespoons (25g)
fine sea salt
Quantity
1 1/2 teaspoons (9g)
unsalted butter
Quantity
3 tablespoons (42g)
softened, plus more for the pan
large egg
Quantity
1
room temperature
melted butter
Quantity
1 tablespoon
for brushing
| Ingredient | Quantity |
|---|---|
| bread flourplus more for kneading | 430g (3 1/2 cups) |
| whole milkwarmed to 110°F | 240ml (1 cup) |
| warm water110°F | 60ml (1/4 cup) |
| active dry yeast | 2 1/4 teaspoons (one packet) |
| granulated sugar | 2 tablespoons (25g) |
| fine sea salt | 1 1/2 teaspoons (9g) |
| unsalted buttersoftened, plus more for the pan | 3 tablespoons (42g) |
| large eggroom temperature | 1 |
| melted butterfor brushing | 1 tablespoon |
Equipment Needed
- •9x5-inch loaf pan
- •Large mixing bowl
- •Wire cooling rack
- •Instant-read thermometer
- •Wooden spoon
- •Plastic wrap or clean kitchen towel
Instructions
- 1
Proof the yeast
Combine the warm water and one teaspoon of the sugar in a small bowl. Sprinkle the yeast over the surface and let it sit undisturbed for 5 to 10 minutes. The mixture should foam and bubble, smelling faintly of fresh bread. If nothing happens, your yeast is dead. Discard it and start again with fresh yeast. This step is your insurance policy.
Water temperature matters. Too hot kills the yeast. Too cold and it won't activate. Aim for the temperature of a warm bath, around 110°F. - 2
Mix the wet ingredients
In a large mixing bowl, whisk together the warm milk, remaining sugar, softened butter, and egg until the butter breaks into small pieces throughout. Add the proofed yeast mixture and stir to combine. The liquid should look creamy and slightly golden from the egg.
- 3
Build the dough
Add the salt and half the flour to the wet ingredients. Stir vigorously with a wooden spoon until no dry patches remain. Add the remaining flour gradually, mixing until a shaggy dough forms and pulls away from the sides of the bowl. The dough will look rough and uneven. That's exactly right.
- 4
Knead until smooth
Turn the dough onto a lightly floured surface. Knead for 8 to 10 minutes using the heel of your hand to push the dough away, then fold it back over itself. Add flour sparingly only if the dough sticks aggressively to your hands. The finished dough should feel smooth, slightly tacky, and spring back when you press it with your finger. It will transform from rough and sticky to supple and alive under your hands.
Resist the urge to add too much flour. A slightly sticky dough produces a more tender loaf. The dough knows what it needs better than you do. - 5
First rise
Shape the dough into a ball and place it in a lightly greased bowl, turning once to coat the surface. Cover tightly with plastic wrap or a damp kitchen towel. Set in a warm, draft-free spot and let rise until doubled in size, about 1 to 1 1/2 hours. The dough is ready when you press two fingers into it and the indentation remains rather than springing back.
- 6
Shape the loaf
Punch down the risen dough with your fist to release the gas. Turn it onto a clean surface. Press into a rough rectangle about 8 inches wide and 12 inches long. Starting from the short end, roll the dough tightly into a cylinder, pinching the seam closed as you go. Pinch the ends and tuck them under. Place seam-side down in a well-buttered 9x5-inch loaf pan. The dough should fill the pan about halfway.
A tight roll prevents air pockets and creates that fine, even crumb you want in sandwich bread. Don't rush this step. - 7
Second rise
Cover the pan loosely with plastic wrap or a kitchen towel. Let rise in a warm spot until the dough crowns about one inch above the rim of the pan, 45 minutes to 1 hour. It should look puffy and pillowy, jiggling slightly when you nudge the pan.
- 8
Prepare the oven
Position a rack in the center of the oven. Heat to 375°F while the dough completes its second rise. A properly preheated oven gives the loaf immediate lift and sets the crust before the interior has time to spread.
- 9
Bake the bread
Place the pan on the center rack. Bake for 30 to 35 minutes, rotating the pan halfway through. The finished loaf will be deep golden brown on top and sound hollow when you thump the bottom. An instant-read thermometer inserted into the center should register 190°F to 200°F. If the top browns too quickly, tent loosely with foil for the final 10 minutes.
- 10
Cool completely
Remove the loaf from the pan immediately and place on a wire rack. Brush the top with melted butter while still hot for a soft, glossy crust. Here is where patience matters most: let the bread cool completely, at least one hour, before slicing. Cut into warm bread and you'll compress the crumb, releasing all that steam that should stay inside. The bread continues cooking as it cools. Wait.
Chef Tips
- •Bread flour contains more protein than all-purpose, typically 12 to 14 percent. That extra protein builds stronger gluten, giving sandwich bread its characteristic chew and structure. All-purpose flour works in a pinch, but the texture will be slightly more tender and less structured.
- •Store your finished loaf cut-side down on a board at room temperature for up to three days. The exposed crumb protects against staling better than any bag. For longer storage, slice the entire loaf, separate slices with parchment, and freeze for up to three months. Toast directly from frozen.
- •If your kitchen runs cold, create a proofing box by heating your oven to 200°F for two minutes, then turning it off. Place the covered dough inside with the door closed. The residual warmth provides an ideal rising environment.
- •The windowpane test confirms proper gluten development: stretch a small piece of dough between your fingers. If it stretches thin enough to see light through without tearing, you've kneaded enough. If it tears immediately, give it another few minutes of work.
Advance Preparation
- •The dough can be made through the first rise, punched down, shaped, and refrigerated overnight in the loaf pan covered tightly with plastic wrap. Let it come to room temperature and complete the second rise (about 1 1/2 to 2 hours) before baking.
- •Baked bread freezes beautifully for up to three months. Wrap the cooled loaf tightly in plastic, then foil. Thaw at room temperature for several hours before slicing.
Frequently Asked Questions
Nutrition Information
1 slice (about 71g)
Where cooking meets culture.
Culinary mentorship, cultural storytelling, and the editorial depth that makes cooking meaningful.
Explore Culinary Advisor