Culinary Advisor
A cooking platform built around craft, culture, and the stories behind what we eat.
Cavatelli
Created by Chef Graziella
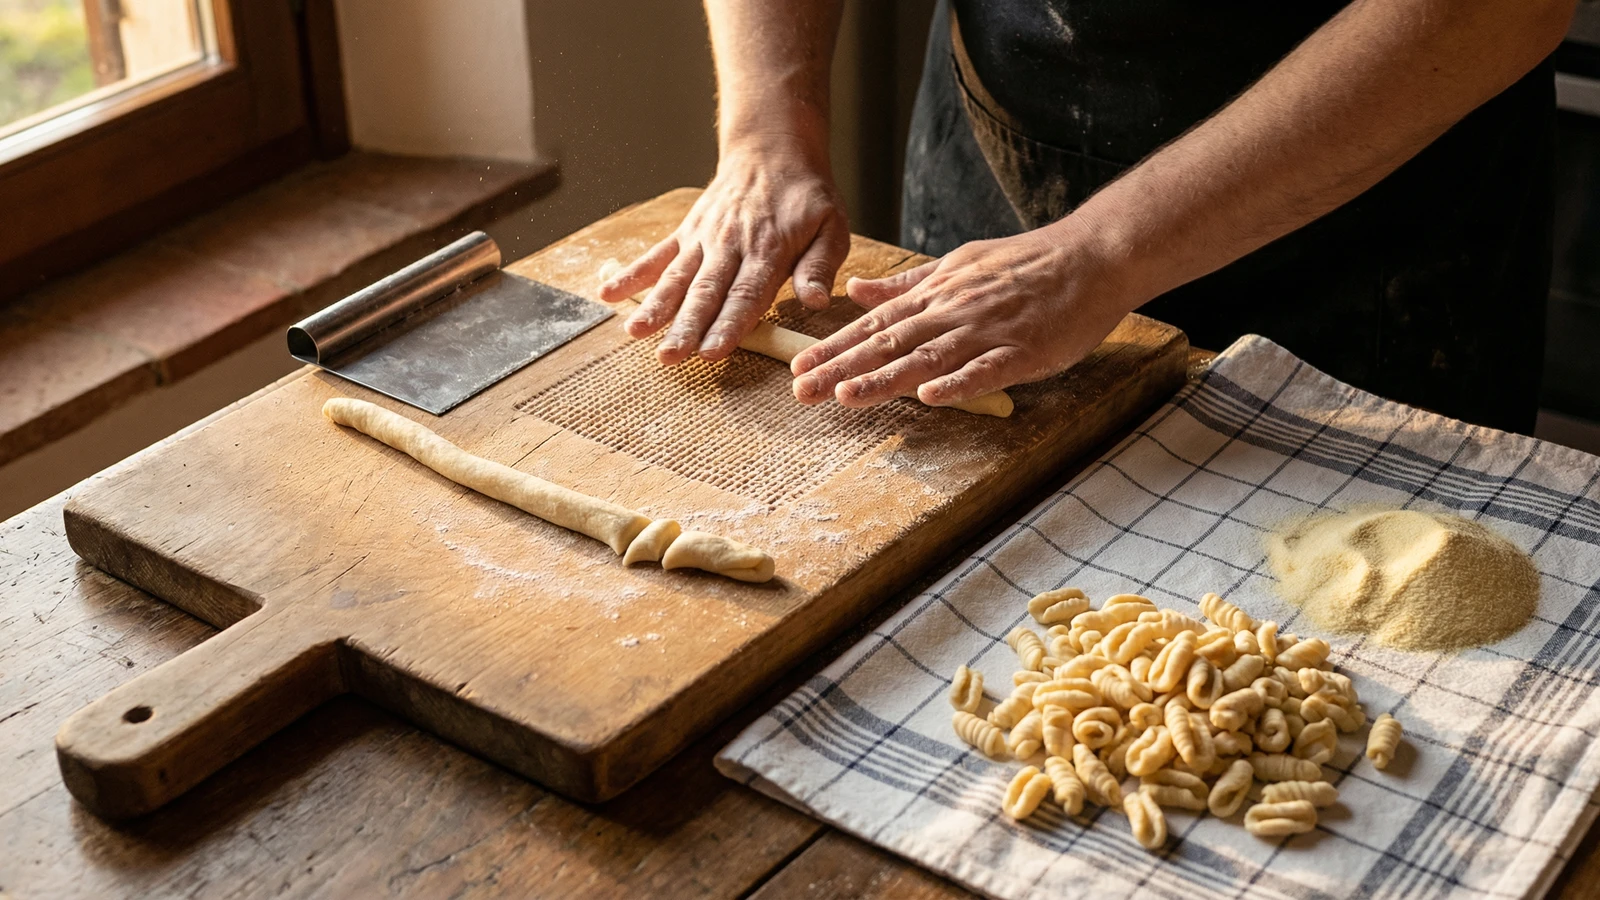
The little hollowed shells of Puglia and Molise, shaped with nothing more than two fingers and a wooden board. The motion takes practice. The result catches sauce like nothing else.
Cavatelli means 'little hollows,' and that is exactly what you are making: small curled shells with a cavity that traps sauce. The technique is simple to describe, harder to master. You press dough with two fingers and drag toward you. The dough rolls over itself and curls. When you do it correctly, each piece emerges hollow in the center and slightly ridged from the wood.
This is semolina pasta, not egg pasta. The dough is firm, almost stiff when you first bring it together. It becomes pliable as you work it, but it will never feel silky like fresh egg pasta. This firmness is necessary. Soft dough will not hold its shape when you drag your fingers across the board.
Puglia claims cavatelli. So does Molise, where they call them cavatieddi. Both regions are correct. These little shells have been made in southern Italian kitchens for centuries, shaped by hands that knew no written recipe. Farm wives made them by feel, thousands at a time, working through mountains of semolina before a feast. You will make fewer. But you will make them the same way.
Simple does not mean easy. The shaping motion takes repetition. Your first attempts may look rough. By the hundredth, you will have found the rhythm. This is how all hand-shaped pasta works: you learn through your fingers, not your eyes.
Cavatelli emerged from the peasant kitchens of Puglia and Molise, where semolina flour was abundant and eggs were precious. The name derives from the verb 'cavare,' meaning to hollow out. Regional variations exist throughout the south: Puglia makes them small and tightly curled, Molise shapes them longer, and Campania sometimes adds potato to the dough.
The technique, the tradition, and the story behind every dish.
Discover Culinary AdvisorIngredients
semola di grano duro rimacinata
Quantity
300g
lukewarm water
Quantity
150ml
fine sea salt
Quantity
1/2 teaspoon
| Ingredient | Quantity |
|---|---|
| semola di grano duro rimacinata | 300g |
| lukewarm water | 150ml |
| fine sea salt | 1/2 teaspoon |
Equipment Needed
- •Large wooden work surface or cutting board
- •Bench scraper
- •Clean kitchen towels or semolina-dusted sheet pans
- •Large pot for boiling
Instructions
- 1
Make the dough
Pour the semolina onto a wooden board or into a large bowl. Add the salt and mix briefly. Make a well in the center and add the lukewarm water. Using a fork, begin incorporating the flour from the inner edges of the well into the water. When the mixture becomes too stiff to stir, use your hands to bring it together into a rough mass. The dough will seem dry and shaggy. This is correct.
The water must be lukewarm, not hot and not cold. Hot water begins to cook the semolina. Cold water makes the dough harder to hydrate. Aim for blood temperature. - 2
Knead until smooth
Knead the dough firmly for 8 to 10 minutes. Press with the heel of your hand, fold, rotate, repeat. The dough will transform from rough and crumbly to smooth and firm. It should feel like modeling clay: pliable but not soft. If it cracks badly when you press it, add water one teaspoon at a time. If it sticks to your hands, add semolina. By the end, the surface should be smooth and slightly tacky.
Semolina dough requires more force than egg pasta dough. Use your body weight. Lean into the kneading. Your forearms may tire. This is normal. - 3
Rest the dough
Wrap the dough tightly in plastic or cover with an inverted bowl. Let it rest at room temperature for at least 30 minutes. The gluten will relax and the dough will become easier to shape. You can rest it up to 2 hours. Do not skip this step.
- 4
Cut and roll ropes
Cut the rested dough into four pieces. Keep three covered while you work with one. Roll the piece into a rope about half an inch thick and even along its length. Use both palms, applying gentle pressure and moving your hands outward as you roll. The rope should be uniform. If it is thicker in some places, the cavatelli will cook unevenly.
- 5
Cut into pieces
Using a bench scraper or knife, cut the rope into pieces about three-quarters of an inch long. Dust them lightly with semolina to prevent sticking. Work quickly. The cut pieces will begin to dry and become harder to shape.
- 6
Shape the cavatelli
Place a piece of dough on your wooden board, lightly dusted with semolina. Press your index and middle fingers firmly into the center of the dough. Now drag your fingers toward you while maintaining pressure. The dough should roll over itself, curling into a small shell with a hollow center. The motion is press, drag, release. The cavatelli should be about an inch long and curled around itself. The ridges from the wood grain add texture that holds sauce.
The first several will look wrong. Continue. The motion lives in your muscles, not your mind. By the time you finish one rope, you will understand. By the time you finish the batch, you will be proficient.If the dough sticks to your fingers, dust them with semolina. If it slides without curling, your board may be too slick. Work on unfinished wood if possible. - 7
Dry the shaped pasta
Place the shaped cavatelli on a semolina-dusted tray or clean kitchen towel. They should not touch each other. Let them dry at room temperature for at least 15 minutes before cooking. This firms the exterior and helps them hold their shape in boiling water. They can dry for up to 2 hours. For longer storage, dry completely and store in an airtight container.
- 8
Cook properly
Bring abundant salted water to a rolling boil. The water should taste like the sea. Add the cavatelli and stir gently to prevent sticking. Fresh cavatelli cook in 3 to 4 minutes. Dried take 8 to 10 minutes. They are done when they float and taste tender but with pleasant resistance at the center. Drain, reserving pasta water, and toss immediately with your sauce.
Chef Tips
- •Seek out semola di grano duro rimacinata, the finely ground durum wheat semolina used throughout southern Italy. American semolina flour works, but the texture is coarser. If your dough feels gritty, your semolina is too coarse.
- •A wooden board is not decorative. The grain of the wood creates the ridges that help sauce cling. A smooth marble counter will not produce the same result. Unfinished wood is best.
- •Some Pugliese cooks use a gnocchi board or butter paddle to create deeper ridges. This is optional. Your fingers and a wooden board are traditional and sufficient.
- •Cavatelli are traditionally served with broccoli rabe and sausage in Puglia, with lamb ragù in Molise, or simply with fresh tomato and ricotta salata. The hollow catches thick, chunky sauces beautifully.
Advance Preparation
- •Shaped cavatelli can be refrigerated on a semolina-dusted tray, covered, for up to 24 hours. They will dry slightly, which is fine.
- •For longer storage, dry the cavatelli completely at room temperature for 24 to 48 hours, then store in an airtight container at room temperature for up to 2 weeks, or freeze for up to 2 months.
- •Frozen cavatelli go directly into boiling water. Do not thaw. Add 2 to 3 minutes to the cooking time.
Frequently Asked Questions
Nutrition Information
1 serving (about 113g)
Where cooking meets culture.
Culinary mentorship, cultural storytelling, and the editorial depth that makes cooking meaningful.
Explore Culinary Advisor