Culinary Advisor
A cooking platform built around craft, culture, and the stories behind what we eat.
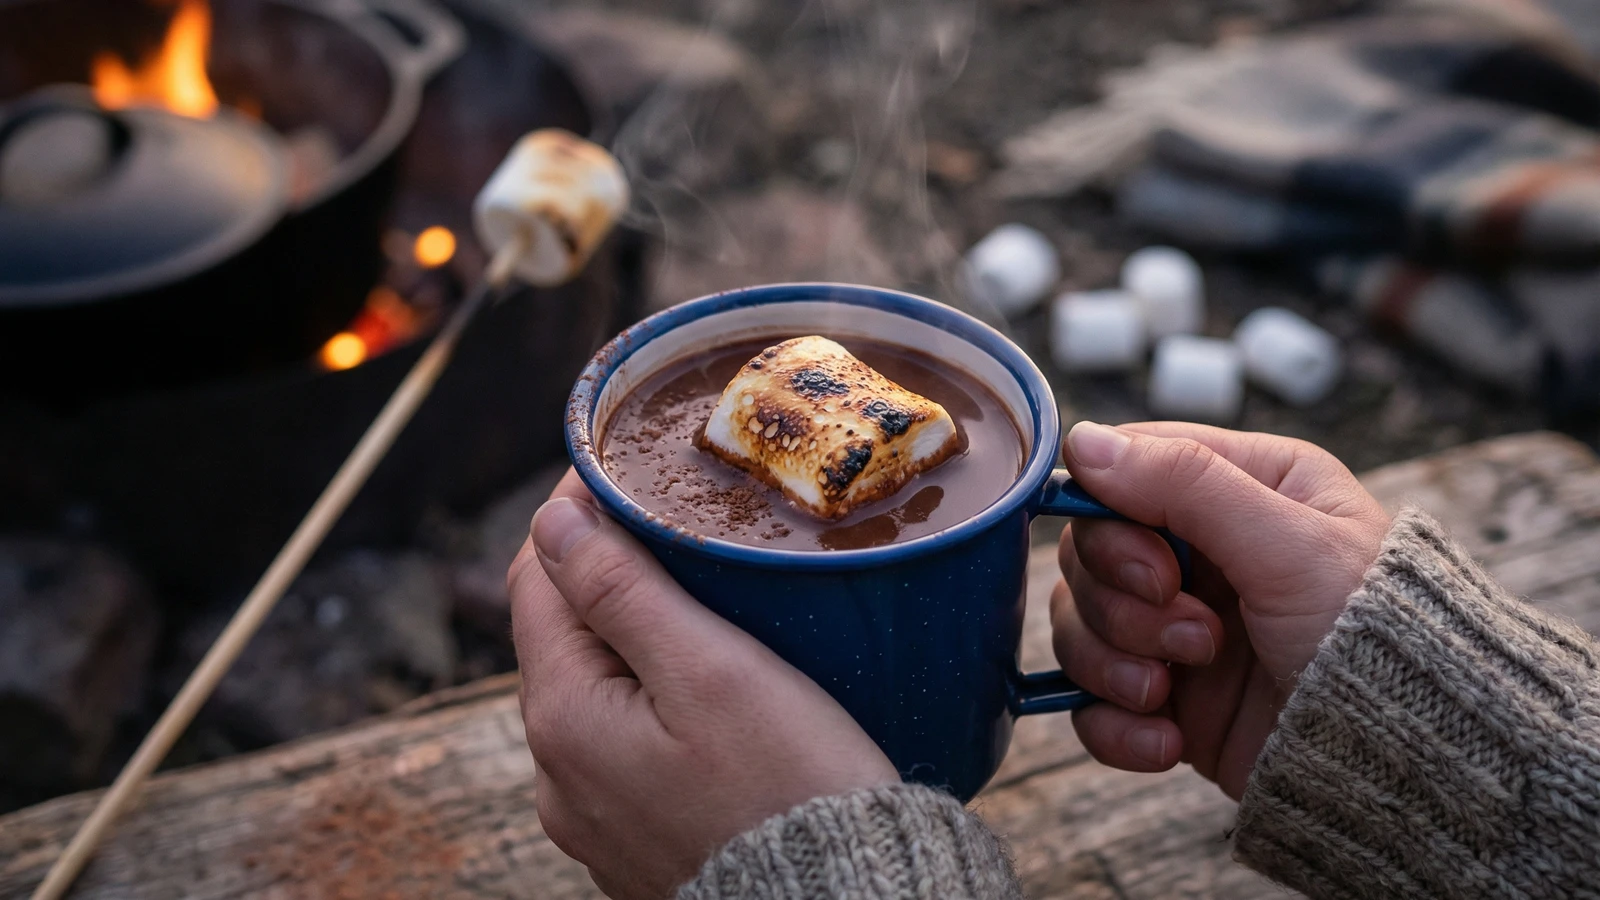
Campfire Hot Chocolate with Toasted Marshmallow
Created by
Honest hot chocolate simmered in cast iron over crackling flames, finished with marshmallows toasted to blistered perfection. This is what your campfire memories should taste like.
Hot chocolate made over a campfire bears no resemblance to the powdered packets of your childhood. This is the real thing: whole milk, dark cocoa, a generous hand with the vanilla, and chocolate that actually tastes like chocolate. The campfire does something no stovetop can replicate. It imparts a faint smokiness to the milk as it heats, a whisper of wood fire that makes every sip taste like the outdoors.
Americans have been making hot chocolate since colonial times, when cacao arrived from Mexico and transformed how we understood warmth in a cup. Thomas Jefferson served it at Monticello. Settlers carried cocoa powder west because it traveled well and delivered comfort after long days on the trail. The tradition of heating milk over open flames connects us to every generation that came before.
The marshmallow is not optional. I mean this. A proper campfire hot chocolate demands a marshmallow toasted until the surface blisters and caramelizes, then dropped into the cup where it slowly melts into a sweet, slightly charred cream. This is theater. This is ritual. This is why we build fires in the first place.
Don't rush the heating. Campfire cooking rewards patience. Position your pot where the flames can lap at the bottom without scorching, stir often, and watch for the moment when steam begins to rise. That's your cue. Pour it into sturdy mugs, toast your marshmallows until they threaten to slide off the stick, and drink it while the stars come out.
The technique, the tradition, and the story behind every dish.
Discover Culinary AdvisorIngredients
whole milk
Quantity
4 cups
heavy cream
Quantity
1/2 cup
Dutch-process cocoa powder
Quantity
1/3 cup
granulated sugar
Quantity
1/4 cup
dark chocolate (60-70% cacao)
Quantity
3 oz
chopped
pure vanilla extract
Quantity
1 teaspoon
fine sea salt
Quantity
1/4 teaspoon
large marshmallows
Quantity
8
for toasting
| Ingredient | Quantity |
|---|---|
| whole milk | 4 cups |
| heavy cream | 1/2 cup |
| Dutch-process cocoa powder | 1/3 cup |
| granulated sugar | 1/4 cup |
| dark chocolate (60-70% cacao)chopped | 3 oz |
| pure vanilla extract | 1 teaspoon |
| fine sea salt | 1/4 teaspoon |
| large marshmallowsfor toasting | 8 |
Equipment Needed
- •2-quart cast iron pot or enamel camping pot
- •Long metal or wooden roasting skewers
- •Whisk or wooden spoon
- •Heat-resistant gloves or pot holder
- •Ladle
- •Enamel camping mugs or heat-safe cups
Instructions
- 1
Build your fire
You need established coals, not roaring flames. Build your fire 20 to 30 minutes before you plan to cook, letting the wood burn down to glowing embers with occasional flame. Position a grate over the fire pit if you have one, or plan to set your pot on a flat rock at the fire's edge. The goal is steady, moderate heat. A raging bonfire will scorch your milk before it warms through.
Hardwoods like oak, hickory, or maple burn longer and provide steadier heat than softwoods like pine. - 2
Combine dry ingredients
In a small bowl, whisk together the cocoa powder, sugar, and salt. This prevents the cocoa from clumping when it hits the warm milk. Clumped cocoa never fully dissolves, leaving you with gritty chocolate and wasted flavor. Take the thirty seconds to do this properly.
- 3
Heat the milk
Pour the milk and cream into your cast iron pot or enamel camping pot. Position it over the coals where heat reaches the bottom evenly. Stir occasionally as the milk warms. Watch for the first wisps of steam rising from the surface, usually after 8 to 10 minutes depending on your fire's intensity. The milk should never boil. If you see bubbles forming at the edges, pull the pot back from the heat.
A wooden spoon works better than metal here. It won't conduct heat to your hand when you rest it against the pot's edge. - 4
Add cocoa mixture
When steam rises steadily from the milk, sprinkle in the cocoa mixture while whisking constantly. The cocoa will resist at first, floating on the surface in stubborn patches. Keep whisking. Within a minute, the mixture will transform into a smooth, dark liquid that smells intensely of chocolate. This is the moment your campsite starts to smell like something worth gathering around.
- 5
Melt the chocolate
Add the chopped dark chocolate to the pot. Stir slowly as it melts into the cocoa mixture, enriching the color and adding body. The hot chocolate should turn glossy and coat your spoon lightly. This takes 2 to 3 minutes of patient stirring. Remove the pot from direct heat once the chocolate has fully melted.
- 6
Finish with vanilla
Stir in the vanilla extract off the heat. Adding it earlier would cause the volatile aromatics to dissipate into the night air. You want that vanilla fragrance in your cup, not floating somewhere above the treetops. Give the pot one final stir and move it to the cooler edge of the fire ring to stay warm while you toast your marshmallows.
- 7
Toast the marshmallows
Thread two marshmallows onto each skewer, leaving space between them. Hold the skewer over the glowing coals, not the flames. Rotate slowly and continuously. The surface will begin to turn golden, then deepen to amber, then blister with spots of dark brown. This takes 2 to 4 minutes of attentive turning. When the marshmallow looks ready to surrender its grip on the skewer, it's done.
For those who prefer a charred exterior with molten center, hold the marshmallow directly in a flame until it catches fire, then blow it out immediately. This is a legitimate technique, not a mistake. - 8
Serve immediately
Ladle the hot chocolate into enamel mugs or heat-safe camping cups. Drop a toasted marshmallow into each, watching it bob on the surface before slowly sinking and melting into the chocolate. Serve a second marshmallow on the side of each mug for those who want to dip as they drink. Pass the mugs around while they're hot enough to steam in the cool night air.
Chef Tips
- •Dutch-process cocoa produces a smoother, less acidic result than natural cocoa. Look for it at any grocery store. Droste and Valrhona make excellent versions worth seeking out.
- •The quality of your chocolate matters. Use something you'd happily eat on its own. Cheap baking chocolate tastes cheap in your cup.
- •If you're camping without refrigeration, substitute evaporated milk mixed with equal parts water. It won't match fresh whole milk, but it travels well and performs admirably.
- •Make extra. Someone always wants a second cup, and cold hot chocolate reheats beautifully the next morning over breakfast coals.
- •A splash of bourbon or dark rum in the adult portions transforms this into something worth staying up late for. Add it to individual cups, not the pot.
Advance Preparation
- •Pre-mix the cocoa, sugar, and salt at home and store in a sealed container for easy campsite assembly.
- •Chop the chocolate before you leave and pack it in a small bag. It will soften slightly in warmer weather but melts just the same.
- •Hot chocolate base can be made up to 3 days ahead and stored refrigerated in a sealed jar. Reheat gently over your campfire, stirring constantly.
Frequently Asked Questions
Nutrition Information
1 serving (about 480g)
Where cooking meets culture.
Culinary mentorship, cultural storytelling, and the editorial depth that makes cooking meaningful.
Explore Culinary Advisor