Culinary Advisor
A cooking platform built around craft, culture, and the stories behind what we eat.
Agnolotti del Plin
Created by Chef Graziella
The tiny pinched parcels of Piedmont, filled with braised meat and sealed with a gesture that has passed from grandmother to granddaughter for centuries. The pinch is both technique and signature.
In the Langhe hills of Piedmont, where fog settles between the vineyards in autumn, women have been making these tiny parcels for generations. The name tells you everything: plin means pinch in Piedmontese dialect. You pinch the dough between thumb and forefinger to seal and portion in one motion. This is not decoration. This is function.
Agnolotti del plin are small, smaller than you expect. Each one should be no larger than a fingertip. This is deliberate. The ratio of tender pasta to savory filling must be precise. Too large, and you taste only meat. Too small, and there is no filling at all. The Piedmontese have been calibrating this ratio for centuries.
The filling is not raw meat mixed with cheese, as in some lesser filled pastas. It is braised meat, already cooked to tenderness, then chopped fine and bound with egg and Parmigiano. The meat has already given up its toughness. What remains is pure flavor. Rabbit, pork, beef, sometimes a mixture: the contadine used whatever the Sunday roast provided.
This is not a beginner's pasta. I will not pretend otherwise. The dough must be thin enough to cook in moments, strong enough to hold the filling. The pinch must be decisive. The parcels must be uniform. But if you have made fresh pasta before and are willing to practice, you can learn this. Piedmontese grandmothers were not born knowing how to pinch. They learned. So can you.
Agnolotti del plin emerged in the Langhe and Monferrato hills of Piedmont, where resourceful cooks transformed leftover roasted meats into elegant filled pasta. The name first appears in written records in the 19th century, though the technique is certainly older. These parcels were traditionally made on Sundays, using meat from the previous day's arrosto, and served at the family meal that anchored the week.
The technique, the tradition, and the story behind every dish.
Discover Culinary AdvisorIngredients
boneless beef chuck
Quantity
1 pound
cut into 2-inch pieces
boneless pork shoulder
Quantity
8 ounces
cut into 2-inch pieces
extra virgin olive oil
Quantity
3 tablespoons
yellow onion
Quantity
1 medium
quartered
carrot
Quantity
1 medium
cut into chunks
celery stalk
Quantity
1
cut into chunks
fresh rosemary
Quantity
2 sprigs
fresh sage leaves
Quantity
4
dry red wine
Quantity
1 cup
beef or chicken broth
Quantity
1 cup
fresh spinach
Quantity
8 ounces
washed
large egg yolks
Quantity
2
Parmigiano-Reggiano
Quantity
1 cup
freshly grated
nutmeg
Quantity
1/4 teaspoon
freshly grated
kosher salt
Quantity
to taste
black pepper
Quantity
to taste
freshly ground
tipo 00 flour
Quantity
400 grams (about 3 cups)
large eggs
Quantity
4
large egg yolks
Quantity
4
extra virgin olive oil
Quantity
1 tablespoon
fine salt
Quantity
pinch
unsalted butter
Quantity
8 tablespoons
fresh sage leaves
Quantity
12
Parmigiano-Reggiano
Quantity
for serving
freshly grated
| Ingredient | Quantity |
|---|---|
| boneless beef chuckcut into 2-inch pieces | 1 pound |
| boneless pork shouldercut into 2-inch pieces | 8 ounces |
| extra virgin olive oil | 3 tablespoons |
| yellow onionquartered | 1 medium |
| carrotcut into chunks | 1 medium |
| celery stalkcut into chunks | 1 |
| fresh rosemary | 2 sprigs |
| fresh sage leaves | 4 |
| dry red wine | 1 cup |
| beef or chicken broth | 1 cup |
| fresh spinachwashed | 8 ounces |
| large egg yolks | 2 |
| Parmigiano-Reggianofreshly grated | 1 cup |
| nutmegfreshly grated | 1/4 teaspoon |
| kosher salt | to taste |
| black pepperfreshly ground | to taste |
| tipo 00 flour | 400 grams (about 3 cups) |
| large eggs | 4 |
| large egg yolks | 4 |
| extra virgin olive oil | 1 tablespoon |
| fine salt | pinch |
| unsalted butter | 8 tablespoons |
| fresh sage leaves | 12 |
| Parmigiano-Reggianofreshly grated | for serving |
Equipment Needed
- •Hand-crank pasta machine (essential for achieving consistent thin sheets)
- •Large wooden board or clean counter for kneading
- •Fluted pastry wheel or sharp knife
- •Heavy 5-quart Dutch oven for braising
- •Large pot for cooking pasta
- •Spider or slotted spoon
- •Sheet pans for holding formed agnolotti
Instructions
- 1
Braise the meat
Pat the beef and pork dry with paper towels. Season generously with salt and pepper. Heat the olive oil in a heavy Dutch oven over medium-high heat until shimmering. Brown the meat in batches, turning to color all sides deeply. This takes 3 to 4 minutes per batch. Do not crowd the pan. Remove the meat and set aside.
Deep browning creates the flavor foundation for the entire filling. Pale meat produces pale flavor. Take your time. - 2
Build the braising liquid
Reduce heat to medium. Add the onion, carrot, and celery to the pot. Cook, stirring occasionally, until softened and beginning to color, about 8 minutes. Add the rosemary and sage. Return the meat to the pot. Pour in the wine and scrape up any browned bits from the bottom. Let the wine bubble until reduced by half, about 3 minutes.
- 3
Braise until tender
Add the broth. The liquid should come about halfway up the meat. Bring to a simmer, then cover tightly and reduce heat to low. Braise until the meat is completely tender and falls apart when pressed, 2 and a half to 3 hours. Check occasionally and add water if the pot threatens to dry out. The meat should remain moist.
- 4
Cook the spinach
While the meat braises, wilt the spinach in a large skillet over medium heat with only the water clinging to its leaves. This takes about 3 minutes. Transfer to a colander and press firmly to extract all liquid. Spinach holds water like a sponge. You must squeeze it nearly dry. Chop finely and set aside.
- 5
Make the pasta dough
Mound the flour on a large wooden board or clean counter. Make a well in the center. Add the whole eggs, egg yolks, olive oil, and salt to the well. Using a fork, beat the eggs gently, gradually drawing flour from the inner walls of the well. When the mixture becomes too stiff to stir, use your hands to bring the dough together.
The extra yolks make this dough richer and more golden than standard pasta. Piedmontese pasta is known for its deep yellow color. The yolks provide this. - 6
Knead the dough
Knead the dough with the heel of your hand, pushing it away from you, folding it back, and rotating a quarter turn. Continue for 8 to 10 minutes until the dough is smooth, elastic, and springs back when pressed. It should feel like your earlobe. If it feels dry, wet your hands slightly. If sticky, dust with flour sparingly. Wrap tightly in plastic and rest at room temperature for 30 minutes.
- 7
Finish the filling
When the meat is tender, remove it from the braising liquid. Discard the vegetables and herbs. Let the meat cool slightly, then chop it very finely with a knife. Do not use a food processor, which makes paste. The texture should be fine but distinguishable. Transfer to a bowl and add the spinach, egg yolks, Parmigiano, and nutmeg. Mix thoroughly. Season with salt and pepper. The mixture should hold together when pressed. Refrigerate until ready to use.
- 8
Roll the pasta
Cut the rested dough into four pieces. Work with one piece at a time, keeping the rest covered. Flatten the piece into a rough rectangle with your hands. Pass it through the pasta machine at the widest setting. Fold it in thirds like a letter and pass through again at the same setting. Repeat this folding and rolling three times. This develops the gluten structure.
A hand-crank pasta machine transforms egg pasta from an expert skill into a learnable one. I recommend it without apology. The sfogline of Bologna roll by hand, but home cooks can achieve excellent results with a machine. - 9
Thin the sheets
Now begin thinning. Pass the dough through progressively narrower settings without folding. Go from the widest to the second-to-thinnest setting on your machine. The sheet should be thin enough to see your hand through it, but not so thin that it tears when handled. For most machines, this is setting 6 or 7. The sheet will be very long. Cut it in half if it becomes unwieldy.
- 10
Fill the agnolotti
Lay a pasta sheet on a lightly floured surface. Along the bottom third of the sheet, place small mounds of filling (about a scant teaspoon each) spaced one inch apart in a straight line. The mounds should be uniform. Fold the top of the sheet down over the filling, pressing gently around each mound to seal and remove air pockets. Air trapped inside will cause the pasta to burst during cooking.
- 11
Pinch to seal
This is the plin, the pinch that gives these their name. Using your thumb and forefinger, pinch the dough firmly between each mound of filling, pressing all the way through to the work surface. Each pinch seals the pasta and separates one agnolotto from the next in a single motion. The pinched edge should be thin and tight. Use a fluted pastry wheel or sharp knife to cut along the sealed edge, separating the row from the remaining dough.
- 12
Separate the agnolotti
Cut between each pinch to separate the individual agnolotti. Each should be rectangular, about one inch wide, with a pinched edge at one end. Place them on a flour-dusted sheet pan in a single layer. They may touch but should not overlap. Repeat with remaining dough and filling. You should have approximately 120 agnolotti.
Work quickly. Fresh pasta dries out and becomes brittle. If the edges dry before you can seal them, they will not hold during cooking. Cover finished agnolotti with a clean kitchen towel. - 13
Make the butter sauce
Melt the butter in a large skillet over medium heat. When the foam subsides, add the sage leaves. Let them sizzle until the butter turns a light hazelnut brown and smells nutty, about 3 minutes. Watch carefully. The line between browned butter and burnt butter is crossed in seconds. Remove from heat immediately when ready.
- 14
Cook the agnolotti
Bring a large pot of generously salted water to a gentle boil. Do not use a rolling boil, which can tear the delicate pasta. Add the agnolotti in batches, stirring gently once to prevent sticking. They cook quickly, 2 to 3 minutes. They are done when they float and the edges are tender. Remove with a slotted spoon or spider, letting excess water drain briefly.
- 15
Serve immediately
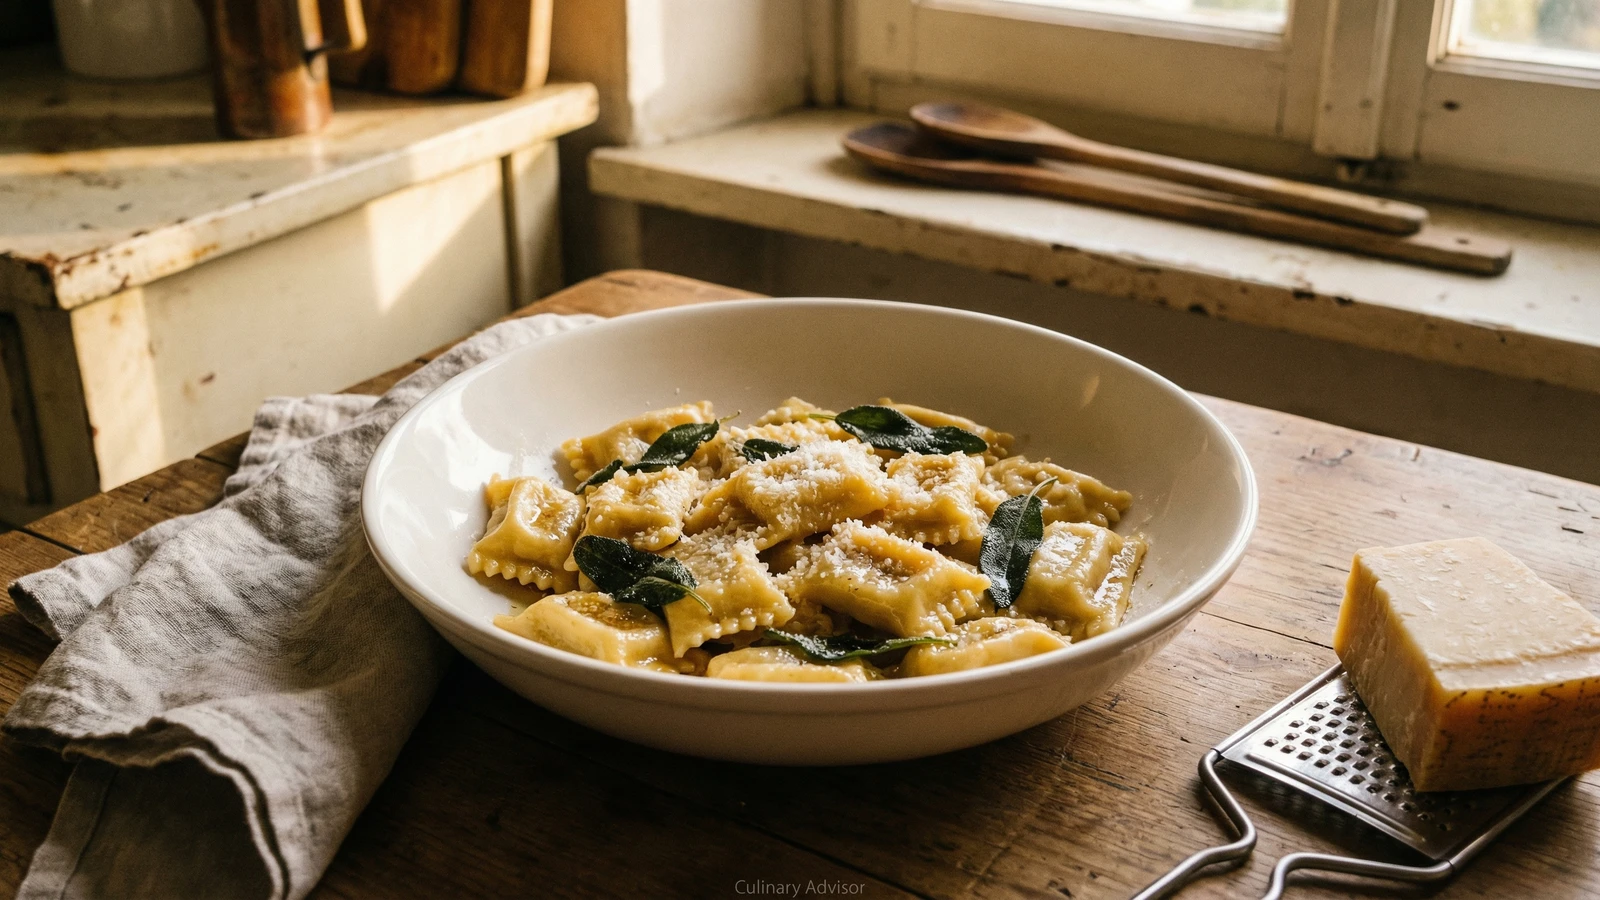
Transfer the agnolotti to warm plates. Spoon the brown butter and sage over them. Scatter Parmigiano generously. Serve immediately. Once the pasta is sauced, invite your guests and family to put off talking and start eating. These wait for no one.
In Piedmont, agnolotti del plin are sometimes served al tovagliolo, placed on a clean linen napkin on a warm plate. The napkin absorbs excess moisture and keeps them warm. This is presentation at its most honest.
Chef Tips
- •The filling can be made entirely from braised beef if pork is unavailable. Some families use rabbit, which is traditional in parts of the Langhe. The principle remains: the meat must be braised first, then chopped.
- •Practice the pinch on scraps of dough before committing to your filled pasta. The motion should be quick and firm. Hesitation creates weak seals.
- •If you cannot find tipo 00 flour, use all-purpose flour. The texture will be slightly different but acceptable. What matters more is proper kneading and thin rolling.
- •Agnolotti del plin freeze beautifully. Arrange them in a single layer on a sheet pan, freeze solid, then transfer to a freezer bag. Cook directly from frozen, adding one minute to the cooking time.
Advance Preparation
- •The braised meat filling can be made up to two days ahead and refrigerated. Bring to room temperature before filling.
- •Pasta dough can bemade up to 24 hours ahead, wrapped tightly, and refrigerated. Let it come to room temperature for 30 minutes before rolling.
- •Formed agnolotti can be refrigerated on floured sheet pans, covered, for up to 4 hours before cooking.
- •Frozen agnolotti keep for two months. Do not thaw before cooking.
Frequently Asked Questions
Nutrition Information
1 serving (about 260g)
Where cooking meets culture.
Culinary mentorship, cultural storytelling, and the editorial depth that makes cooking meaningful.
Explore Culinary Advisor